

This project is a long time coming. I actually bought the yarn for this project over a year ago, because, if you’ll remember, one of the very first Knit Your Comics came out in July 2015 and was Captain America themed. The doily I created was my first attempt at the shield, but my real goal was a circle shawl, a daunting project for someone who had never knitted a circular shawl before or done a project that large.
But Captain America means a lot to me—now, more than ever—and I knew that it would take some time, but I would be able to extrapolate based on the successful doily and make my shield. So, I purchased the yarn, and it sat and sat.
I knitted a lot of other things, which you can find on Ravelry. At first KYC was designed to be a monthly project, but as my projects got more complex and life-related complexities abounded, it became more like every two months, and so my long-suffering editor and I decided to make it official: KYC will be coming out every two months from now on. And I scheduled the release of this pattern to be on July 4th which, while colloquially known as America’s birthday, is canonically Captain America’s birthday!
But all of that is background to understanding this project, which I’ve wanted to do for a very long time, and how proud I am of it, and how eager I am for you to see it.
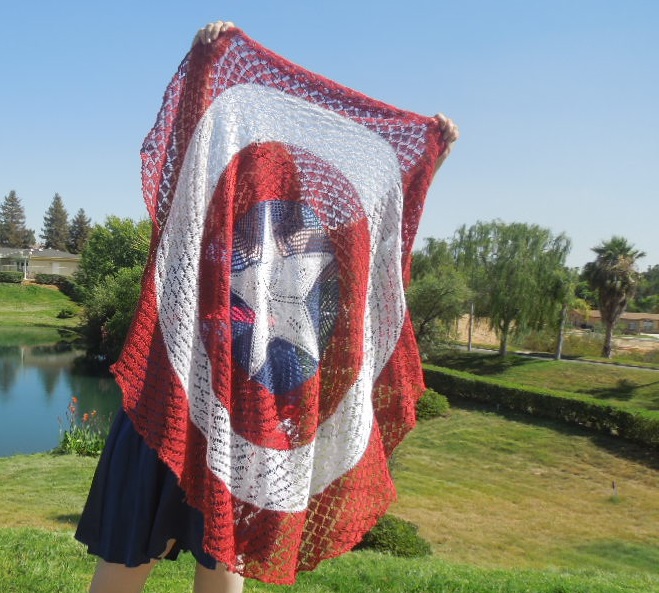
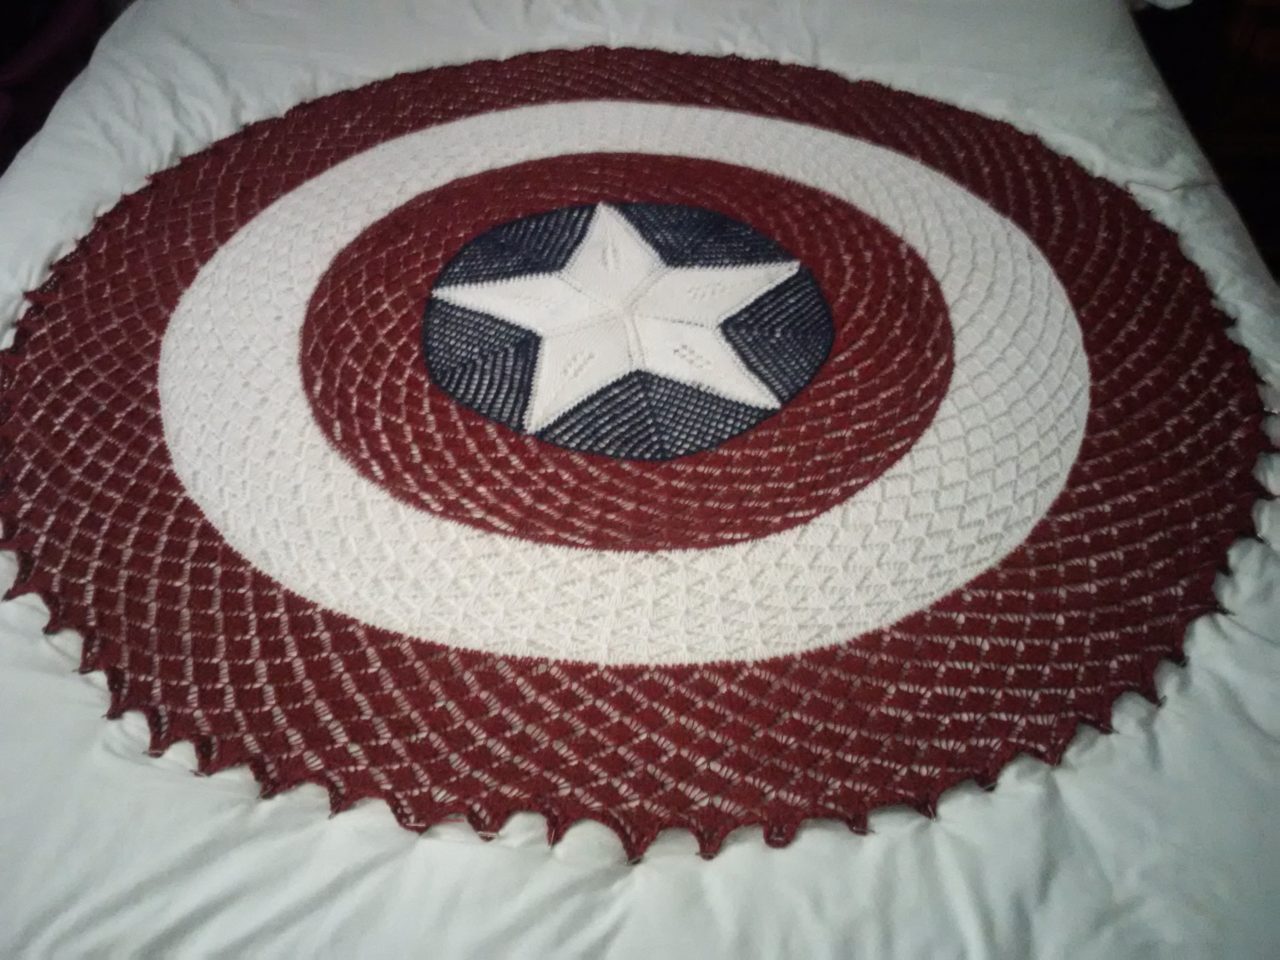
This is my Shield Shawl, and as you can see, it goes wonderfully well with this particular dress.
So, let’s get to the pattern, shall we?
Yarn & Supplies
It is incredibly hot and sticky where I live during the summer, and I dislike the feel of cotton yarns. There. I said it. So my Shield Shawl is knit with 100% linen yarn. I’d never knitted with linen yarn, but I loved it. The yarn feels so good between your fingers, and according to the experienced women I’ve spoken with, linen just gets softer when you wash it. You can wash it. Why doesn’t everyone knit with linen yarn?
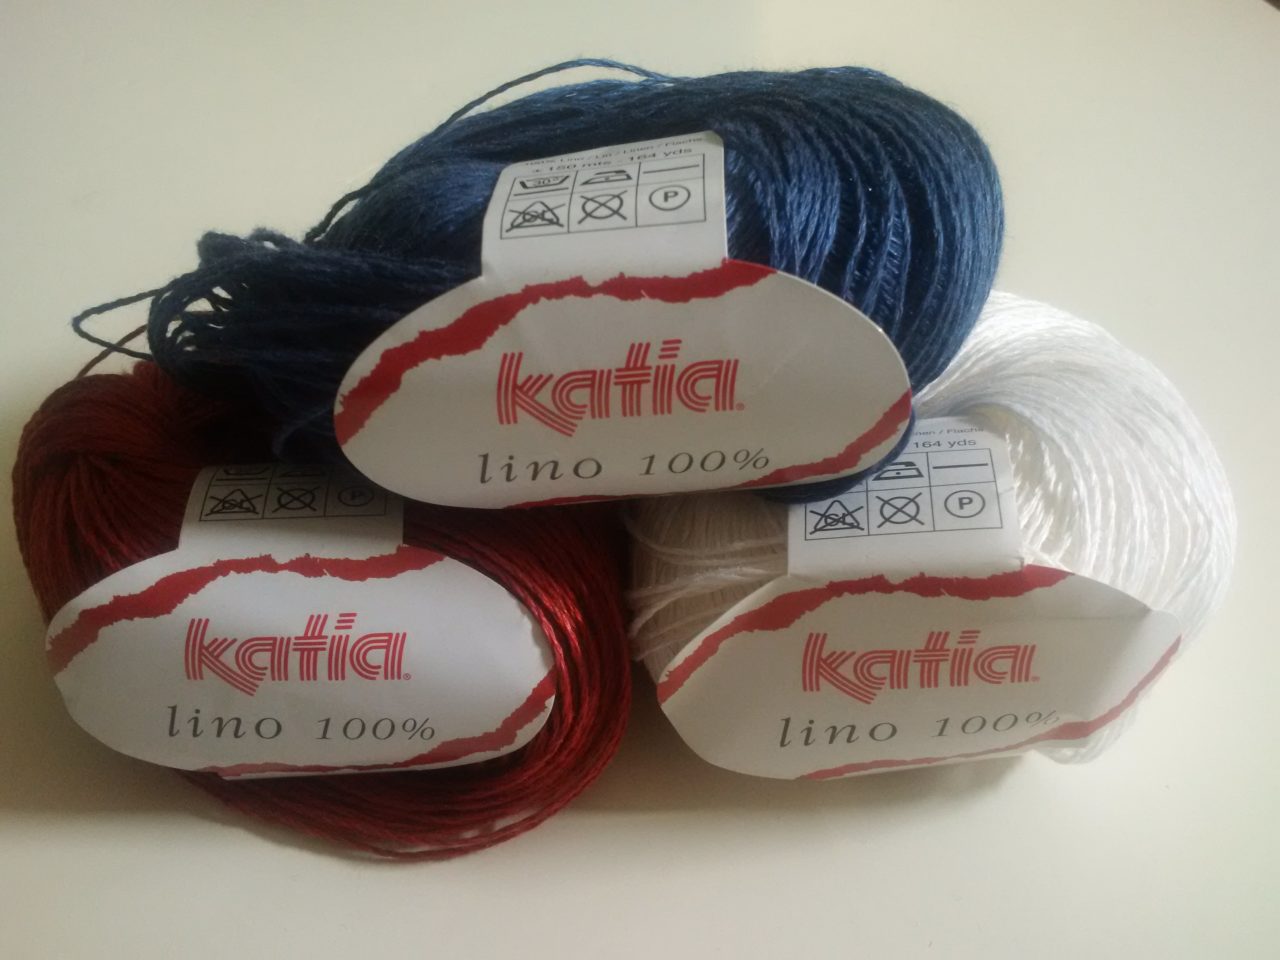
Well, it’s fairly expensive, as it turns out. It runs about $9 per 50g ball, and this project utilized 10 balls (1 blue, 3 white, and 6 red). But it’s well worth the price, in my opinion, especially if you’re only making one, for yourself, or as a gift for someone you really, really care about. The other great thing about this yarn is that if you, hypothetically, only order only 4 balls of red and then realize you need more a year later, the dye lot doesn’t appear to matter, since it matched exactly with your previously bought yarn. Hypothetically. Without the labels and dye lots listed, I honestly wouldn’t be able to tell them apart.
So with my yarn selected, I turned to the needles. Unless you are a person who has shelled out money for one of those ever-expanding interchangeable needle kits, you will need to purchase at the very least a 60” circular needle for the outer rings. But I wanted a bigger circular, and much to my sadness, they do not make one. So I decided to make my own (for about the same cost as my 60” circular needle).
I tend to buy circular bamboo needles by the set, because they are under $10, including shipping, and I am often breaking my bamboo needles by sitting on them or having them bend a way they don’t want to bend in my purse. This also means that I have extras in different lengths. I took one of my oldest sets and stripped the plastic tubing from it, leaving me with two needles that only needed tubing.
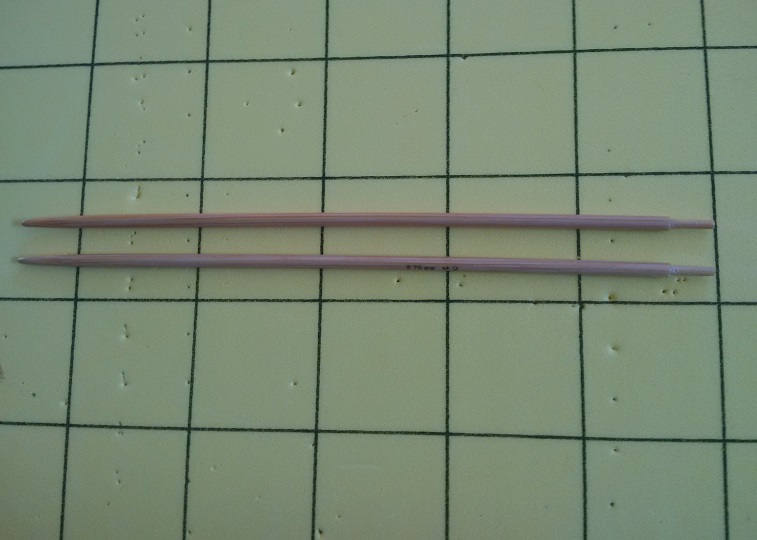
The tubing is difficult to find. But after a lot of research and a couple trips to hardware stores, I ended up buying this food grade vinyl tubing. I’m not sure what it’s normally used for, but it works perfectly for my purposes, with one exception. It’s slightly too small to go onto my needles in that it’s the same diameter as the part they’re intended to go on. But I have a fix!
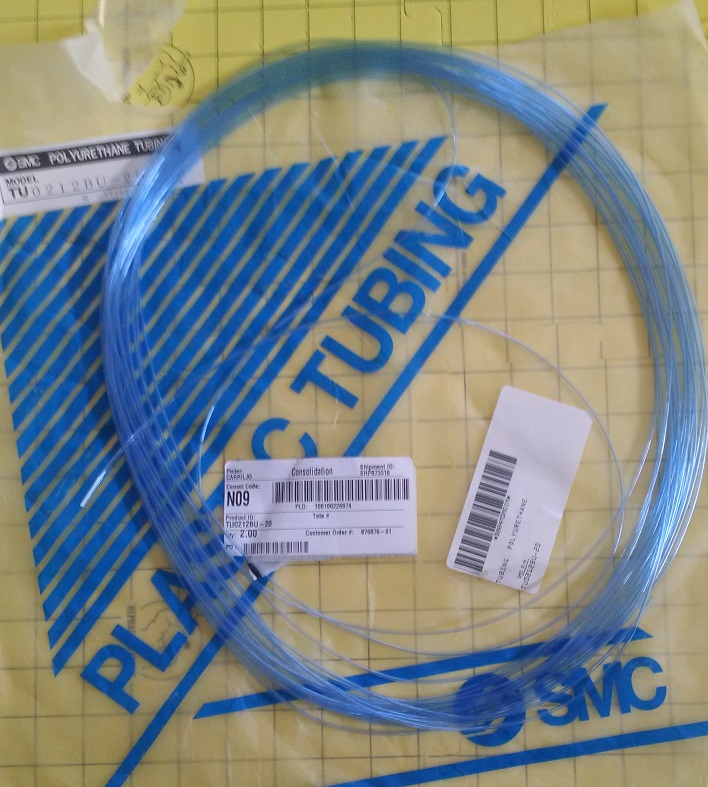
I knew that boiling water would soften the tubing and make it expand, so that’s what I did, making the worst tasting tea ever. And with a little bit of patience and a lot of frustration, I was able to work the tubing onto the needle.

Miracle of miracles, once it cooled, the tubing stayed stretched, but did not shatter or break. One half of my circular needle achieved, I was left with a second quandary: how long should the needle be?
To solve my problem, I knitted the first two rows of the white ring, up until the part where you start the pattern, on my 60″ circular. Then I transferred it over to the new circular needle. Then I spaced the stitches where they looked happy, and cut the tubing, and then added the other needle to the other end. Clunky and weird, yes, but it worked, and since I had no idea how long it should be, it seemed the best way to work it out.
It’s been weeks since I made my extra-long circular knitting needle, and I knitted the outer two rings without a single crack or snag. I haven’t used this method on larger sized needles, but I can’t see why it wouldn’t work—you’d just need larger tubing. And the best part is that I can redo it whenever I need to—I can make one longer, shorter, whatever I need for whatever project. Customizable circular needles. Is it as easy as buying the existing sets? Absolutely not. But it is a hell of a lot cheaper.
The Pattern
The pattern is knit on 2.75mm needles. I have no idea why the label for the yarn says it should be knit on 5.0mm needles. It’s not a worsted weight at all. At most it has the thickness of DK yarn, but it feels like a light fingering to me.
The Star
The star should look familiar since it’s the exact same star I created for the Steven Universe Garnet Gauntlets, only bigger and with a lace edging and decorative eyelet middle.
Cast on 10 stitches using amigurumi magic loop method.
Row 1: Knit around.
Row 2: Knit 1, YO, K1, K1, YO, K1.
Row 3: Knit around.
Row 4: K1, YO, K1, YO, K1,
Row 5: Knit around.
Row 6: K1, YO, Knit across to last stitch, YO, K1. (7)
Row 7: Knit around.
Repeat rows 6 & 7
9, 11, 13, 15, 17, 19, 21, 23, 25 = 125 stitches around.
Now each point on the star will be completed individually, knit back and forth using straight needles or a short circular, switching to double pointed needles as necessary.
Starting with 25 stitches:
Row 1: K1, YO, SSK, K6, SSK, YO, centered double decrease, YO, K2TOG, K6, K2TOG, YO, K1.
Row 2 (and all even rows) Purl.
Row 3: SSK, YO, Knit across to last 2 stitches, YO, K2TOG.
Row 5: SSK, YO, K6, SSK, YO, centered double decrease, YO, K2TOG, K6, YO, K2TOG.
Row 7: SSK, YO, Knit across to last 2 stitches, YO, K2TOG.
Row 9: SSK, YO, K5, SSK, YO, CDD, YO, K2TOG, K5, YO, K2TOG.
Row 11: SSK, YO, Knit across to last 2 stitches, YO, K2TOG.
Row 13: SSK, YO, K4, SSK, YO, CDD, YO, K2TOG, K4, YO, K2TOG.
Row 15: SSK, YO, Knit across to last 2 stitches, YO, K2TOG.
Row 17: SSK, YO, K5, CDD, K5, YO, K2TOG.
Row 19: SSK, YO, Knit across to last 2 stitches, YO, K2TOG.
Row 21 SSK, YO, K4, CDD, K4, YO, K2TOG.
Row 23: SSK, YO, Knit across to last 2 stitches, YO, K2TOG.
Row 25: SSK, YO, K3, CDD, K3, YO, K2TOG.
Row 27: SSK, YO, Knit across to last 2 stitches, YO, K2TOG.
Row 29: SSK, YO, K2, CDD, K2, YO, K2TOG.
Row 31: SSK, YO, Knit across to last 2 stitches, YO, K2TOG.
Row 33: SSK, YO, K1, CDD, K1, YO, K2TOG.
Row 35: SSK, YO, Knit across to last 2 stitches, YO, K2TOG.
Row 37: SSK, YO, CDD, YO, K2TOG.
Row 39: SSK, K1, K2TOG.
Row 41: SSK, YO, Knit across to last 2 stitches, YO, K2TOG.
Row 43: CDD.
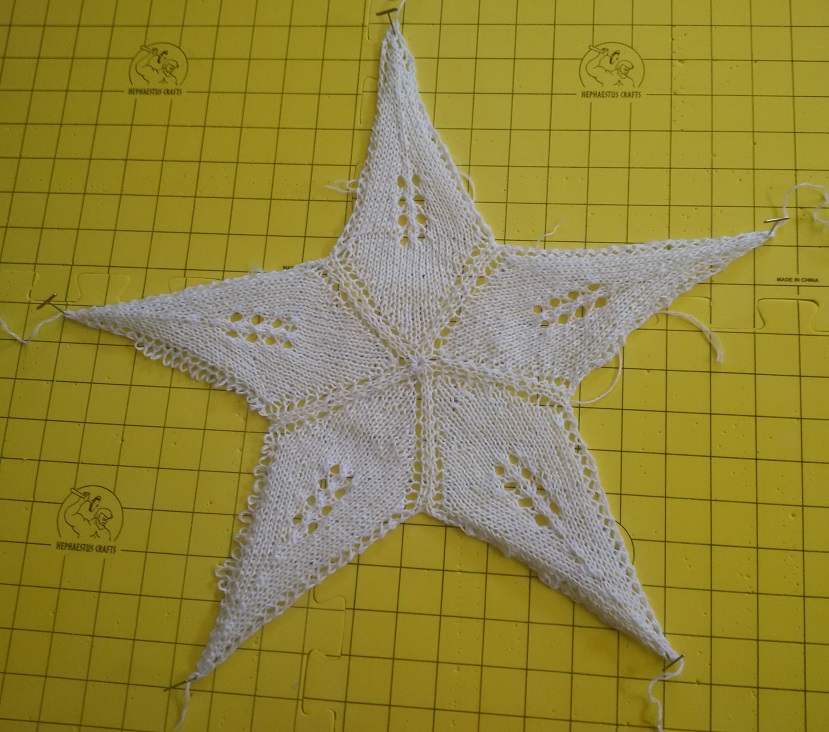
Once you’ve finished the star, it’s time for the blue fills.
Blue Fills (Repeat 5 times)
Note 1: When you’re picking up the stitch, pick up both loops of the stitch to be worked. This helps defining the lace edge of the star points.
Note 2: Since you are not picking up loops when you purl across, you are picking up every other stitch.
Row 1: (WS) Pick up center stitch.
Row 2: (RS) Pick up right stitch, k1, pick up left stitch.
Row 3: (WS and all WS rows from this point on) Purl.
Row 4: Pick 1, K3, Pick 1.
Row 6: Pick 1, K2TOG, YO, K1, YO, SSK, Pick 1.
Row 8: Pick 1, K2TOG, YO, K3, YO, SSK, Pick 1.
Row 10: Pick 1, K2TOG, YO K2TOG, YO, K1, YO, SSK, YO, SSK, Pick 1.
Work in this pattern until all side stitches have been picked up. You will have 10 “rows” of lace and 43 stitches.
Bind off loosely.
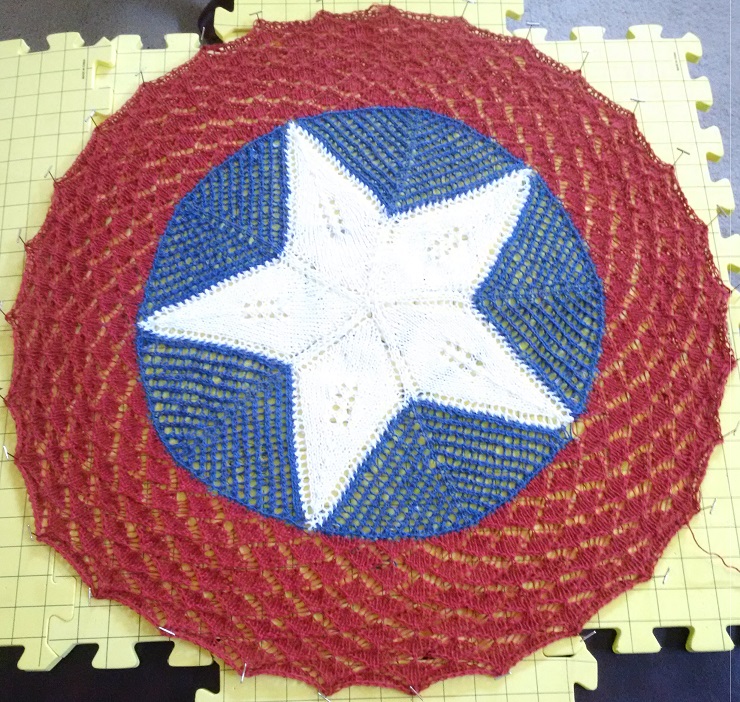
With the center of your shield finished, it’s time for the rings. There’s lots of different kinds of Captain America shields out there, and they all have different proportions of center-to-rings.

I opted for the one closest to the movie shield, where the height of the blue and the height of the rings is roughly the same.
Ring #1 – Red
Pick up 45 stitches for each blue wedge, 225 stitches in total, on a circular needle.
K3, YO. Repeat around. 300 stitches total.
Knit one more round, placing a marker every 60 stitches.
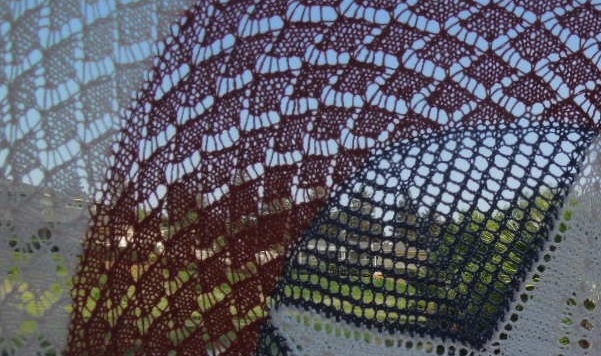
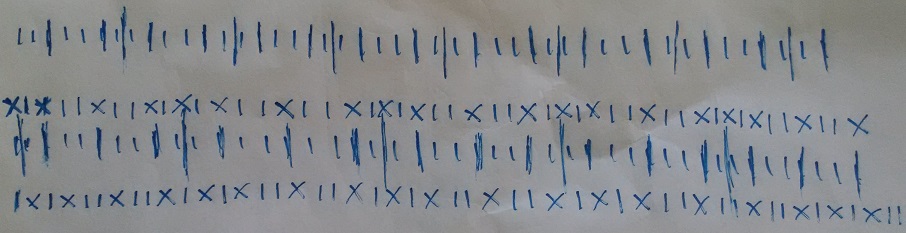
The rings are worked using a small diamonds lace pattern, which is a variation of the openwork diamonds pattern knit over 10 stitches and 8 rows instead of over 8 stitches and 12 rows.
Begin Small Diamonds lace pattern:
Row 1: K1, YO, SSK, K5, K2 TOG, YO.
Row 2: K2, YO, SSK, K3, K2TOG, YO, K1.
Row 3: K3, YO, SSK, K1, K2TOG, YO, K2.
Row 4: K4, YO, CDD, YO, K3.
Row 5: K3, K2TOG, YO, K1, YO, SSK, K2.
Row 6: K2, K2TOG, YO, K3, YO, SSK, K1.
Row 7: K1, K2TOG, YO, K5, YO, SSK.
Row 8: CDD, YO, K7, YO.
Repeat Small Diamonds pattern 5 times.
Knit around one time, then bind off loosely since you’ll be picking up those stitches for the next ring.
Ring #2 – White
Increase from 300 to 450 stitches using the following pattern: K2 YO. Repeat around.
90 stitches per wedge.
Knit around.
Begin Small Diamond Pattern. Repeat pattern 5 times as with previous ring.
Knit around. Bind off loosely.
Ring #3 – Red
Maths were tricksy on this one. I actually had to do some knitters’ math with scratches to figure out how to make it work—but I triumphed!
Increase from 450 to 750 stitches using the following pattern:
K1, YO, K1, YO, K2, YO, K2, YO. Repeat 15 times. 150 stitches per wedge.
Knit around.
Begin Small Diamond Pattern. Repeat pattern 5 times as with previous ring.
Since this is the final outer ring and the shawl needs to be blocked for maximum gorgeousness, you need a super stretchy bind off. I read through a few of the patterns on Ravelry and decided on this super stretchy bind off.
Super Stretchy Bind Off For Circle Shawls:
Row 1: YO, K1. Repeat around.
Row 2: Purl bind off.
What I actually did, though, instead of purling all the way around was to turn my work upside down so the wrong side was facing me, and then I did the standard knitted bind off.
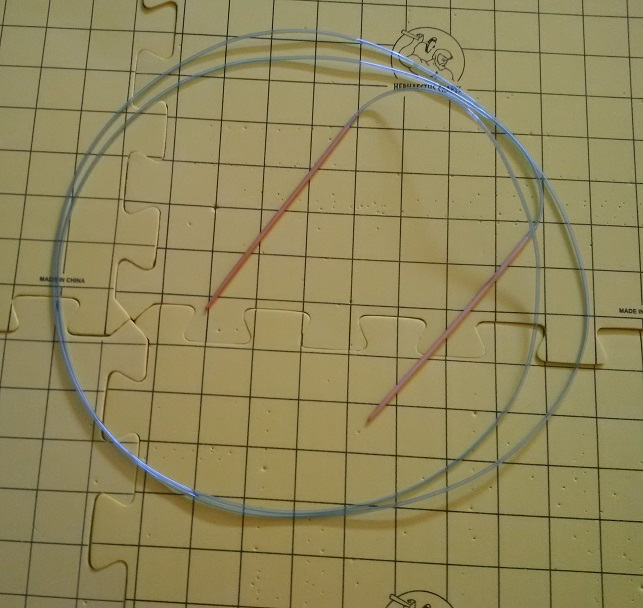
Unblocked, it’s still huge.

But we still have blocking to do.
Finishing (Blocking) and Final Notes
Once you have your shawl completed, you need to block it for maximum prettiness. Allegedly, when you block something like this you don’t have to block it every time you wash it, but I don’t know if that’s true. I tend to line-dry and hang-dry my clothes even if they can go in the dryer, so I obviously have trust issues.
For blocking advice I turned to this post from The Yarn Harlot, which led me to this tutorial by Judy Gibson and my blocking technique took both of their advice. First, I soaked the shawl in the bath with some wool wash for about an hour. I did notice the water was a bit pink when it drained from the red yarn, but it did not bleed over into the white at all, thankfully. Also the linen dries a little stiff, so next time I wash it I might try machine washing and add some fabric softener.
That is, if I can get up the nerve to pin again. It took me over an hour to fully pin the shield to the bed, and by the time I was done with one edge, the other edge was already dry thanks to California dry heat and a fan to circulate air. That left one edge a little ruffley, but I’m okay with that.
I wasn’t sure what the final edge would be like, but it ended up being slightly ruffly when dried since I didn’t have enough patience to pin each stitch individually. I’ve never used blocking wires, but I’m curious now if that would be easier.

This project was a long time coming, and it feels so good to have it done. It was a lot of work, though, and you will feel like you will never finish the outermost red ring. I realized that one round took me an entire episode of The Musketeers. I was able to watch two seasons while I finished it, (and two seasons of Drunk History), which adds up to more than 40 hours of work just on that ring. And it was quite difficult if you’re still new to lacework, as I was, which is why I would rate it an E for EVIL on the difficulty scale. But it’s done now, and I’m really proud of it. I’m especially to have it done right before I’m going to SDCC, so I can share it with people there. (If you see me, say hi!)
The next KYC will be published, hopefully, this September, so keep your eye out for that. As always, the pattern will go up on Ravelry. I love seeing people’s finished projects and seeing comments from people wanting to knit my patterns or just appreciating that they exist, so thank you everyone who has commented so far, and I hope you stick around. And if you have any suggestions for comics-inspired things you’d like to see knitted, you know where to find me.

