

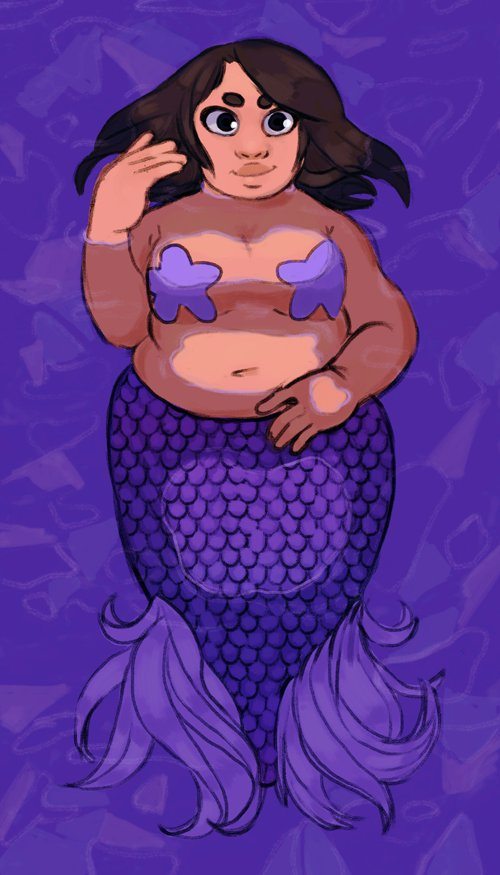
Although most of the comics I consume and have been featured here are part of the Big Three family, I’ve long wanted to include more projects inspired by indie comics and zines. The very first Knit Your Comics (before it was Knit Your Comics!) was a scarf inspired by Noelle Stevenson’s Nimona. So I was thrilled when I heard about the Fat Mermaids charity zine project and inspired to create my own knitted contribution. I was inspired in particular by this picture posted on the zine-maker’s Twitter, as I felt the feathery fins would prove particularly gorgeous and challenging. (I was right on both counts).
And with a little time, effort, blood, sweat, and tears, this doll came together:

This project is not challenging to knit, as the doll’s body is mainly knit in the round, but it is filled with a lot of seaming, and a lot of time-consuming activities, such as making and joining the arms, making the feathery fins, making and applique-ing the starfish pasties, adding the hair stitch by stitch, adding the face, and finally, ruching the torso to create fat rolls. Because of that, this project earns a C for Challenging.
Yarn & Supplies
Your yarn may vary. This is an excellent project for stashbusting, as mermaids would naturally come in many different shapes and colors. I was lucky enough to find yarn that matched with my inspiration picture already in my stash, though I did purchase the yarn that I used to create her hair. You can also vary your yarn sizes based on color or aesthetic, since gauge doesn’t really matter.
- DK, Light Worsted, or Worsted weight yarn for the mermaid’s tail
- DK, Light Worsted, or Worsted weight yarn for the mermaid’s torso
- DK, Light Worsted, or Worsted weight yarn for the mermaid’s hair & eyebrows
- Additional yarn for the starfish pasties (weight doesn’t matter)
- Additional yarn for the feathery fins (weight doesn’t matter)
- Additional yarn (preferably in bulky/roving 1-ply style) for the mermaid’s lips
- Needle and thread for sewing the feathery fins, as well as for ruching the mermaid’s torso.
- Plastic eyes (whatever size you find aesthetically appealing)
- Polyfil stuffing, any brand
- Yarn needle
Pattern
Body
With Yarn A (I used DK weight and 3.0 mm dpn needles), cast on 6 stitches in the round using any technique you like (I like the magic loop).
Row 1: Knit.
Row 2: KFB around. (12 stitches)
Knit 4 rows.
Row 7: KFB around. (24 stitches)
Knit 8 rows.
Row 16: KFB around.
Knit 16 rows.
Row 33: KFB around.
Knit 32 rows.
Instead of casting off, you’re going to turn the cone inside out so the purl side is on the outside. I know it sounds strange, but trust me.
You’re going to now change colors and continue to knit in the round. You’re also switching yarns, and depending on what yarn you pick, you might be switching yarn weights (going from DK weight to worsted creates a lovely knitted “muffin top” effect!). I switched to a 3.25 mm needle.
With yarn B, knit 8 rows.
Decrease rows.
Knit 6, knit 2 together. Repeat around. (84 stitches)
Knit 8 rows.
Knit 5, k2tog. Repeat around. (72 stitches)
Knit 18 rows.
Shape the armholes.
Needle 1: Bind off 4, Knit 14.
Needle 2: Knit 14, Bind off 4.
Needle 3: Bind off 4, Knit 14.
Needle 4: Knit 14, bind off 4.
Rearrange to knit back and forth on straight needles (28 stitches and 28 stitches).
Knit 12 rows in stockinette stitch.
Now, before you go any further, you need to make your arms. Leave the stitches on the body live so they can be joined with your arms in the round for shaping the shoulders.
Arms
The arms are knit flat, seamed, and then attached in the round.
Cast on 8 stitches on scrap yarn using your favorite provisional cast on method. These stitches will be unraveled and joined as live stitches to form the shoulders and neck.
Knit in stocking 2 more rows than necessary for provisional cast on purposes.
Row 1: Knit FB, knit to last 2 stitches, KFB, Knit 1.
Row 2: Purl.
Repeat these two rows 4 times, until you have 20 stitches total. Cast on 4 stitches using backwards cast on. Turn.
Row 13: Knit across row. Cast on 4 stitches using backwards cast on. Turn.
Row 14: Purl.
Work 24 rows in stockinette stitch.
Things are about to get weird.
Work the thumb:
Row 39: K12 [K22 for second arm], turn.
Row 40: P6, turn.
Working on these 6 stitches only, work in stockinette stitch for 12 rows.
Row 53: Knit across the 6 thumb sts, then knit across the 22 [6] sts remaining on the needle.
Row 54: Purl across all sts. (28sts)
Work in stockinette stitch for 10 rows.
Row 63: (K2tog) to the end of the row. (14 stitches)
Row 64: Purl.
Row 65: K2tog. (7 stitches)
Cut off thread, leaving a long tail, and slip yarn through using yarn needle to tighten.
Before arms can be joined to the body, they need to be seamed up the sides, and the the thumbs need to be shaped. The thumbs are formed by folding in half and seaming up the sides. The thumb does not need to be stuffed as the inner seams provide enough stability. The arms can be seamed up using the long tail from the arms.
Shoulders & Head
Now to join in the round.
Arrange your needles in this order: Front, right arm, back, left arm. (28 stitches, 8 stitches, 28 stitches, 8 stitches) You will be K2TOG and SSK at the shoulder junctions, shaping the shoulders as if you were shaping the toe of a sock. I found it easiest to use a small circular and then switch to DPNs as I decreased.
Stop decreasing when you reach 14 stitches per DPN.
At this point, it is wisest to stuff the body and arms of the mermaid with your stuffing. Trust me.
Done? Good. Continue shaping neck and head.
Knit 2 Tog (around) 28 stitches.
Knit 6 rounds.
Increase for head.
Needle 1: KFB, knit 6.
Needle 2: Knit 6, KFB.
Needle 3: KFB, knit 6.
Needle 4: Knit 6, KFB.
Knit around. (32 stitches)
Needle 1: KFB, knit 7.
Needle 2: Knit 5, KFB, K1.
Needle 3: KFB, knit 7.
Needle 4: Knit 5, KFB, K1.
Knit 18 rows stockinette. (36 stitches)
Knit2tog around. (18 stitches)
Knit around.
Knit 2 Tog around. (9 stitches)
Cut a long tail and draw the yarn through the stitches with the yarn needle, but don’t pull too tightly just yet. First you have to stuff the head. You also need to add the eyes you’ll be using if you are using plastic eyes.
NOW you can draw it tight.
Finishing Up
Five more things to do, and you can do them in any order.
Starfish Pasties
(Make 2)
Cast on 5 stitches.
Row 1: KFB. (10 stitches)
Row 2: Purl.
Row 3 KFB. (20 stitches)
Row 4: Purl.
Row 5: Knit 4 stitches. Turn.
Row 6: Purl.
Row 7: SSK, K2tog.
Row 8: Purl 2 tog.
Cast off.
Seam edges of the starfish together and applique to the chest region of your mermaid.
Feathered Fins
The mermaid’s feathery fins are created using this tutorial for brushed yarn wigs for dolls.
Step 1: Cut and separate your yarn and create the wefts on a 10” piece of yarn. You’ll need to leave about 2” on either end, which gives you about 6” of wefts to create. You will feel like you’re making more wefts than you need, but the flat ironing slims it down.
Step 2: Comb your wefts in preparation for flat ironing.
Step 3: Flat iron your wefts and arrange them snugly on the yarn.

Step 4: To attach your wefts as fins, knot the two edges together and attach them to the tip of your mermaid’s fin. Then, using needle and matching thread, whipstitch the wefted yarn to the mermaid’s tail.
Mermaid’s Hair
If you’ve ever made fringe or tassels for a scarf using a crochet hook, you will be using the same technique to add individual pieces of yarn to your mermaid’s head for hair. I started at the center, and then moved down on either side. I skipped every other stitch on the back of the mermaid’s head to keep it from being too bulky.

Mermaid’s Face
To add eyebrows and lips, you’ll be using a yarn needle.
First the lips. Ideally you’ll be using a 6” piece of bulky 1-ply yarn like Paton’s roving.
The lips are made using three stitches. Enter into the right side, and come up where you want the lips to start. Draw the yarn through (making sure to leave a tail) and across 3 stitches for the lips. You’re going to then dip your needle into that stitch, creating the lower lip, and then back up underneath the center of those stitches to set up half of the top lip. Draw the yarn up and then go back into the same corner of the mouth. Then draw the yarn underneath to the opposite corner of the mouth and draw the yarn up. Finish creating the second half of the upper lip by drawing the yarn down into the center of the top lip, and then two out across the opposite side of the head.

The eyebrows are made using the same technique as the lower lip (in the side, one giant backstitch, and then doubled in case your yarn is on the thin side, like mine was, out the other side).
Fat Rolls
Finally, if you want to add some fat rolls or a muffin top, you’ll need to use a needle and thread to shorten the doll’s torso. You can do this anyway you like. I took a long piece of thread, knotted and doubled it, and went in at the waist, knotting and circling there, then out at the neck, circling there, and then back down to the waist to secure and knot. Beware of yarn puckering if it’s too snug, though the fold of the muffin top should hide it.

And that’s it! Your fat mermaid doll is ready to bring joy to the world. The Fat Mermaids zine is only available until September 17th, 2016, so hurry!
