

Knit Your Comics returns with a special pattern for all my fellow crystal gems. True confession: I’d never watched Steven Universe until I started this project. I’d crowdsourced for KYC ideas and someone mentioned the show, and the project seemed doable. But I needed a show to watch while working on this project, and so I put it on. After watching all the episodes on Hulu, I’ve been converted. I didn’t know I could get so emotional about an 11-minute cartoon, but the show sure manages to pack a wallop. (Also check out this review on WWAC of the Steven Universe comic!)
Garnet’s gauntlets were a natural choice for a KYC. Frustratingly, they were filled with fabrication challenges. How do you get diagonal lines? What about the star on top? Do I really have to make gloves, or can I just make fingerless gloves? It took me a few attempts experimenting and finding a pattern that works.
The gloves are deceptively simple in appearance, but require color changes, the kitchener stitch, i-cord, applique, and duplicate stitch. Therefore, they’ve earned themselves a C for Challenging rating on my scale.

Yarn and Other Supplies
Because Garnet’s gloves are extra big, I went with a worsted weight yarn for extra bulk. Color was more important than using the same brand, so I browsed the aisles at Michael’s until I found yarn that were the right pinks and garnet.
They are:
- Red Heart Soft in Berry
- Vanna’s Choice in Raspberry
- Impeccable by Loops & Threads in Lippy
You need a little bit of black for the glove fingertips and i-cording edging. Finally, you’ll need yellow for the star. I chose a DK-weight yellow, because it was the right color, which happens to be Anne Geddes’s Baby Yarn in Bumble.
You’ll also need:
- a 24” circular needle size 4.0 needles (or size to achieve gauge)
- Size 4.0 mm doublepointed needles
- Size 2.75 mm doublepointed needles (if you are using DK weight for the yellow star)
- Yarn needle
- Stitch holders
- Stitch markers
The Pattern
The Gauntlet
The base of Garnet’s Gauntlets is worked flat as a chevron and then folded in half and seamed together to create a tube with diagonal lines. Gauge is not essential to the pattern, but my gauge ended up being roughly 3 stitches by 4 rows.
In my first version, I created a slipped stitch edge, because I thought it would be better for picking up stitches later. I was wrong. Don’t do it. Instead, just try to keep your edge stitches looser than your body stitches, because you’ll be picking them up for the i-cord and for the glove fingers later.
Garnet’s Gauntlets are worked with worsted weight yarn on size 4.0 mm needles.
Cast on 81 stitches using provisional cast on method of your choice.
Hot Pink 1 (5 rows—10 total, split, to be seamed together)
(RS) K1, YO, K39, Center Double Decrease (henceforth noted as CDD), K38, YO, K1
(WS) P1, Purl through back loop of YO, Purl across to next YO, Purl through back loop, P1.
(RS) K1, YO, K39, CDD, K38, YO, K1
(WS) P1, Purl through back loop of YO, Purl across to next YO, Purl through back loop, P1.
(RS) K1, YO, K39, CDD, K38, YO, K1
Garnet 1 (12 rows, beginning with WS)
(WS) P1, Purl through back loop of YO, Purl across to next YO, Purl through back loop, P1.
(RS) K1, YO, K39, CDD, K38, YO, K1
End on RS.
Hot Pink 2 (10 rows, beginning with WS)
(WS) P1, Purl through back loop of YO, Purl across to next YO, Purl through back loop, P1.
(RS) K1, YO, K39, CDD, K38, YO, K1
Garnet 2 (12 rows, beginning with WS)
(WS) P1, Purl through back loop of YO, Purl across to next YO, Purl through back loop, P1.
(RS) K1, YO, K39, CDD, K38, YO, K1
Hot Pink 3 (5 rows, second half of split stripe, to be seamed)
(WS) P1, Purl through back loop of YO, Purl across to next YO, Purl through back loop, P1.
(RS) K1, YO, K39, CDD, K38, YO, K1
(WS) P1, Purl through back loop of YO, Purl across to next YO, Purl through back loop, P1.
(RS) K1, YO, K39, CDD, K38, YO, K1
![]()
Once you’ve finished your chevron, it’s time to seam it into a tube. This is probably the weirdest step, but I promise it will work. Using two circulars, use kitchener stitch to create a tube. I found it easiest to actually do this is sections instead of all at once, since you’re skipping 8 stitches at either end of the tube to create the thumbhole.
On the side you’re starting on, place the first marker on the 9th stitch. Place the second marker, counting in from the other side and place it on the 16th stitch.
Section one: Use kitchener stitch to join together the first 8 stitches on both needles, ending at the first marker. Leave a tail for weaving in ends, remove marker, and then move the next 8 stitches on both needles onto a stitch holder. (16 stitches total).
Section two: Use the kitchener stitch to join the middle section, starting from the 17th stitch (the first stitch after the section on the stitch holder) to the second marker. Leave a tail for weaving in ends, remove marker, and then move the next 8 stitches on both needles onto a stitch holder. (16 stitches total).
Section three: Use the kitchener stitch to join the final 8 stitches together. Leave a tail for weaving in ends.
Now, you’ve created your tube and a hole for the thumbhole.
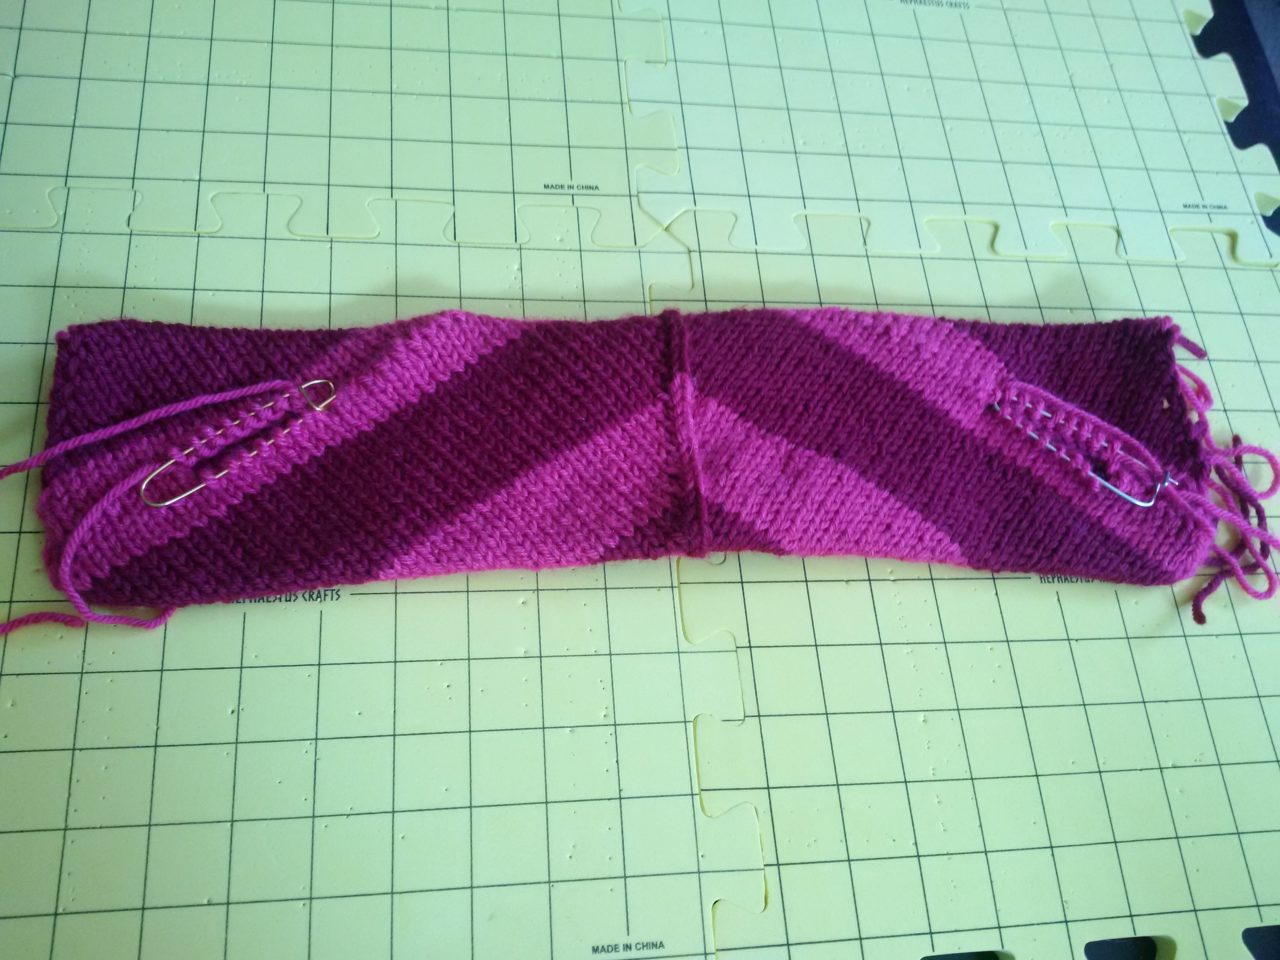
Now, depending on which way you fold the tube, the diagonal stripes will go one direction or the other. You need to fold one tube one way and the other tube the other way so you have one going in each direction, as shown in the reference photo.
The Thumb
The thumb needs to be done first so you can get rid of those stitches. It also secures your folded tube. Once you have the tube folded the way you need it, line up the thumb holes and transfer the stitches to doublepoint needles. It’s best to alternate the stitches from the different layers on the same needles, since you’ll be knitting them together as you knit around.

Using the garnet yarn, pick up 18 stitches from each layer. Knit one stitch from each layer together as you knit around. Decrease down to 14 stitches using this method: Row 1: Knit around to last two stitches, k2tog. Row 2: Knit around. Repeat rows 1 and 2 until you decrease down to 14 stitches. Continue with garnet up until the knuckle of the thumb. Switch to black for 5 rows, then do one row K2TOG all around. Draw yarn through 6 stitches. Bind off.
The I-cord Edging
I noticed that at the base of Garnet’s fingers the black section seems to be raised a little, so I decided to create an i-cord section that that also secures the two layers together and creates a raised/puffy edge.
The i-cord trim follows this tutorial and is a 6-stitch i-cord. It’s also very important to work your i-cord from the outside in, so the slipped stitch join is the last stitch. It needs to be curling inward, rather than outward.
It’s also very important to pick up the middle two loops of yarn for the i-cord, because you’ll be picking up the innermost stitch when you make the fingers, if you decide to make gloves with fingers.

Glove Fingers
(If making fingerless gloves, skip this step.)
Index finger: Using size 4.0 double point needles and burgundy yarn, pick up 10 stitches from the inside of the i-cord and make 4 stitches (I found the backward loop cast on works really well) (14 total). Knit with burgundy 11 rows or until you reach the second knuckle. Switch to black for 5 rows, then do one row K2TOG around. Draw yarn through 7 stitches. Bind off.
Middle finger: Using size 4.0 double point needles and burgundy yarn, pick up 6 stitches from both sides of the inside of the i-cord and the 4 stitches made on the previous finger. Make 4 additional stitches (20 total) Row 1: Knit around to last two stitches, k2tog. Row 2: Knit around. Repeat rows 1 and 2 until you decrease down to 14 stitches. Continue knitting with burgundy until you reach the second knuckle. Switch to black for 5 rows, then do one row K2TOG all around. Draw yarn through 7 stitches. Bind off.
Ring finger: Using size 4.0 double point needles and burgundy yarn, pick up 5 stitches from both sides of the inside of the i-cord and the 4 stitches made on the previous finger. Make 4 additional stitches (18 total). Row 1: Knit around to last two stitches, k2tog. Row 2: Knit around. Repeat rows 1 and 2 until you decrease down to 14 stitches. Continue knitting with burgundy until you reach the second knuckle. Switch to black for 5 rows, then do one row K2TOG all around. Draw yarn through 7 stitches. Bind off.
Pinky finger: Using size 4.0 double point needles and burgundy yarn, pick up 10 stitches from the inside of the i-cord and and the 4 stitches made on the previous finger (14 total). Row 1: Knit around to last two stitches, k2tog. Row 2: Knit around. Repeat rows 1 and 2 until you decrease down to 12 stitches. Continue knitting with burgundy until you reach the second knuckle. Switch to black for 5 rows, then do one row K2TOG all around. Draw yarn through 6 stitches. Bind off.
The 5-pointed Star
For DK weight yarn, I used 2.75 needles. Cast on 10 stitches using the amigurumi crochet magic ring for knitting method I discuss in the first KYC: Captain America Star Spangled Doily pattern. You let the stitches stay on the crochet needle, and then transfer to doublepoint needles.

Divide on three needles—4 stitches, 4 stitches, 2 stitches.
Row 1 (and all odd rows): Knit around.
Row 2:
Needle 1: K1, M1, K1, K1, M1, K1.
Needle 2: K1, M1, K1, K1, M1, K1.
Needle 3: K1, M1, K1.
Row 3: Knit around.
Row 4: (Subdivide onto 5 needles)
Needle 1: K1, M1, K1, M1, K1.
Needle 2: K1, M1, K1, M1, K1.
Needle 3: K1, M1, K1, M1, K1.
Needle 4: K1, M1, K1, M1, K1.
Needle 5: K1, M1, K1, M1, K1.
Row 5: Knit around.
Row 6:
Needle 1: K1, M1, K3, M1, K1.
Needle 2: K1, M1, K3, M1, K1.
Needle 3: K1, M1, K3, M1, K1.
Needle 4: K1, M1, K3, M1, K1.
Needle 5: K1, M1, K3, M1, K1.
Row 7: Knit around.
Row 8:
Needle 1: K1, M1, K5, M1, K1.
Needle 2: K1, M1, K5, M1, K1.
Needle 3: K1, M1, K5, M1, K1.
Needle 4: K1, M1, K5, M1, K1.
Needle 5: K1, M1, K5, M1, K1.
Row 9: Knit around.
Decrease each arm individually working back and forth.
Row 10: SSK, K5, K2Tog, turn work.
Row 11: Purl across.
Row 12: SSK, K3, K2Tog, turn work.
Row 13: Purl across.
Row 14: SSK, K1, K2Tog, turn work.
Row 15: Purl across.
Row 16: Bind off 3.
Repeat for each arm of the star, leaving tails for attaching to the glove.
Attach the star to the glove using the cast off tails from the points of the star using a yarn needle and a combination of duplicate stitching and whipstitch. Since the glove is double-layered, you can applique to the first layer only and hide the tails in between the layers.

Pink Domed Diamonds (knuckle detail)
This was possibly the hardest part of the pattern, even though the resulting pattern is very simple. I couldn’t figure out how to create a puffy pyramid shape that I could attach to the knuckles, but eventually, after re-watching the show and paying attention, I decided on just a diamond shape, because the effect is a domed diamond shape when attached to the glove.
Make 4.
Cast on 1 stitch.
Row 1: Knit and purl in the same stitch.
Row 2: k1, yo, k1 (3 stitches)
Row 3: P1, yo, purl through back loop, yo, p1 (5 stitches)
Row 4: K1, yo, knit through back loop, k1, knit through back loop, yo, K1 (7 stitches)
Row 5: P1, purl through back loop, p3, purl through back loop, p1 (7 stitches)
Row 6: SSK, k3, K2tog (5 stitches)
Row 7: P2tog, P1, P2tog (3 stitches)
Row 8: CDD, bind off, leaving a 4″ tail.
For added security, I recommend stitching the diamonds together at the corners, so there’s no chance of them separating when flexing the fingers.

Final Thoughts
This is not a project for the faint of heart, but the end result is pretty dang cool looking, in my opinion. You could probably bulky it up even more using different kinds of bulky yarn, but I’m not sure what effect that would have on the wearability and comfort of the gloves.

There’s a lot of color changes, and if you’re not a weaver-in of ends (like I’m not), I recommend putting a dot of fabric glue on your color-change knots, which you can get from any craft store.
Now, go save the universe, my gems!


