

Batman v Superman: Dawn of Justice comes out this month, and in between more morose trailers and recent adorably fun skits, I was hit with inspiration. Racking my brain for this month’s Beauty and the Geek, I knew I wanted to make it a good one to make up for the two months column absence. I thought doing a play on Batman v Superman could be fun; plus, it’s double the content, right? It was a bit more difficult than I wanted, simply because when choosing color palettes for Superman and Batman DCCU versions, the colors were very muted. Zack Synder’s typical movie palette has been pretty consistent overall. His style involves darker colors, higher contrasts, and low saturation.

Having a specific color palette style in your films gives director a notable style and can set their movies apart from others. For a makeup lover like me, gathering up colors based on these muted tones, however, was more difficult than I originally imagined it would be.
Batman is pretty simple; his colors are mainly black and gray. Superman, on the other hand, was more of a problem. His colors are suppose to be blue and red, but the blues and reds in his suit are so dark that they were tough to match. So I said, screw it! Beauty and the Geek isn’t about straight up copying a look or creating perfection; it’s about learning and experimentation. Also, fun. Because if makeup isn’t fun, then why bother with it?
So, instead of going straight and narrow, I improvised a bit. I decided to include a little yellow into my Batman look and go with brighter blues for my Superman.
As always, I go through a face routine: moisturizer, primer, concealer, foundation. I’m still using Neutrogena’s Oil-Free Moisture for Combination Skin. I’ve been using this moisturizer for almost a year now, since I moved further south. It has a smooth consistency and very little scent to it and makes my skin feel soft and smooth. My main problem with this moisturizer is that it doesn’t completely keep oil at bay for as long as I want. This could be a combination of a couple different things I do in my routine, but I find that after maybe five or so hours, my nose, chin, and cheeks begin to get oily. So, it might be time for a change. But if you want an affordable moisturizer for combo skin to try out, I do recommend Neutrogena. Their skincare products overall are pretty decent.
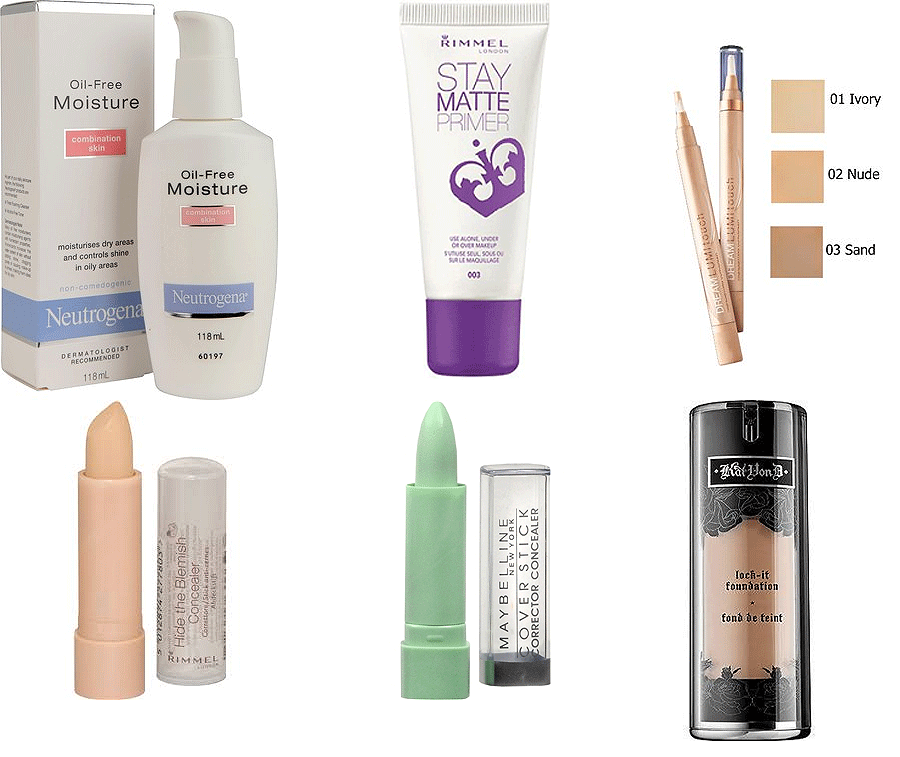
For my primer I use Rimmel London’s Stay Matte Primer 003. It has a thick consistency, no smell, and does keep your skin matte underneath your makeup for at least five hours. My biggest problem with this primer is that it can leave white lines on your face if you don’t really buffer it into your skin. I’ve had this happen to me when I’m rushing in the mornings and just slapped some on before heading out the door, only to find later white smears around my mouth which is not a good look. So, it’s really important to remember to buffer your products into your skin.
I use a few different concealers when going about my full face routine. The first is Maybelline’s Dream Lumi Touch Highlighting Concealer in Nude. I love this concealer for my dark circles. It’s creamy with orange color correcting undertones that cancel out the purples and blues in under eye bags and blends really nicely into my skin. I also use it as an eye shadow primer to keep my eye shadow and liner from smudging.
The next concealer I use is green concealer on any red spots or bright red blemishes I may have (typically after a bad breakout). I’ve been using Cover Stick Corrector Concealer in Green by Maybelline. Honestly, I don’t love this green concealer. It’s creamy erring on the side of overly thick and can be very hard to blend in. You can’t wear this alone, only with a full face. It does help take away redness, but I still find myself a little reluctant to use it regularly. I prefer L’Oreal Studio Secrets Professional Primer Anti Redness even if it leaves green lines on my face sometimes due to the super thin consistency. Basically, the quest for a good green concealer continues.
The last concealer I use is Rimmel London Hide the Blemish Concealer. I don’t love this concealer; the formula is very thick and almost sticky. That being said, it does conceal and isn’t super hard to blend. It’s just thicker than I would like.
Finally, after all that, I get down to my foundation. I recently bought a high end foundation from Kat Von D’s Lock-It Tattoo foundation line. It’s amazing and hands down my favorite foundation I’ve used to date. If you’ve read some of my previous BaTG’s, you know I’m a fan of Revlon’s Colorstay foundation line because it has foundation for normal, dry, and combo skin. I still stand by this foundation as an affordable choice, but if you have money to splurge, I completely recommend Kat Von D’s Lock-It Tattoo foundation for fellow combo skinned people. It’s very buildable and blends well without too much trouble. The formula is thick and doesn’t require much out of the bottle, so you’re not over-using it. Since it costs so much, I was originally wary of over-using it, but my worries were negated by the fact that a little goes a long way with this product. It’s also lightweight, more so than Colorstay, which is a big plus for me, since I don’t like feeling like I’m wearing foundation.
My biggest problem with Kat Von D’s Lock-It Tattoo is the lack of overall colors in the line. There’s only about sixteen colors total, and the darkest is Deep 74, which I’ve seen brown and black women use in various videos and tutorials, but if you’re darker than that, this line is not for you, unfortunately. I wish Kat Von D had a wider array of colors to fit more women, particularly darker skinned women.
I usually just use my fingers to rub my moisturizer and primer in, but remember to blend and that you don’t leave any messy lines (especially for primer depending on the color some come in). For my concealer, I use a concealer brush to cover the area. The concealer brush I currently own is E.L.F.’s Studio Concealer Brush, which is a dollar at the drugstore or online (plus tax and shipping). It’s not the best brush; while the bristles are solid and don’t fray, I found the brush surprisingly difficult to clean. But I use it to spot various blemishes around my face, and I typically use a bigger brush or my fingertips (only after washing my hands) to blend it out.
With my Dream Lumi Concealer, I create a triangle shape under my eyes and blend it out using a combination of my beauty blender from Real Techniques and my stippling brush from E.L.F. cosmetics. I’ll use my stippling brush to blend out the concealer and then gently dab my beauty blender over the area again so everything looks nice and smooth. When blending out concealer under your eyes, it should look smooth and the color bright. Not too bright, but nicely blended into your skin without being cakey or thick.
Finally, with my foundation, I pump one dollop onto the back of my hand and use my larger stippling brush (also from E.L.F.’s Studio line) to dab along my face in specific spots: forehead, cheeks, chin, nose, and jawline. I learned from a makeup artist at my local Sephora that this technique helps minimize putting too much product on your face, while also making it easier to blend everything together. I usually like to go over my face with my beauty blender to smooth it all out. Note about beauty blenders: make sure they’re damp when using. They don’t need to be soaking wet—in fact, that’s bad, so don’t do that—but they should be damp. What I do is run my blender under some lukewarm water, squeeze it out three times. Then I’ll run it under a towel or washcloth to grab any excess water. If you use it dry, your foundation will stick and soak into the sponge. Don’t be me and make the same mistake I did!
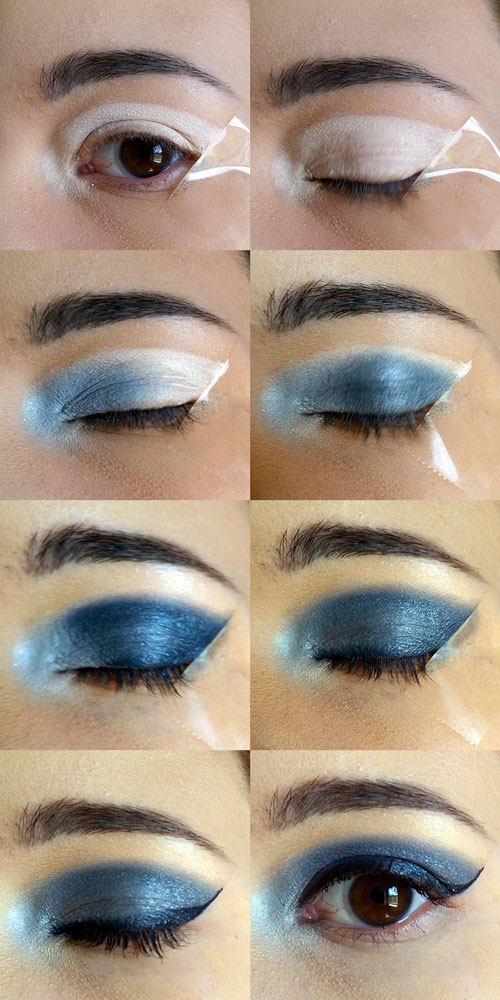
Now, the fun stuff starts! Batman’s colors in Batman v Superman are basically black and grey with a side of Batfleck smirk and that hot blue dress shirt he wore when he went and saved that little girl. So there’s not a lot you can do with that. That’s okay, I still made it work and had fun anyway.
I decided to embrace the darkness and go with a dark silver eye shadow called Gun Metal that I got as a sample from Surreal Makeup at MegaCon Fan Days. It’s a very pigmented shadow with a very loose consistency. It doesn’t feel chalky, which is nice; however, the fallout was a big problem for me. But the color works and the glitter mixed in with the powder adds a bit of pop to the otherwise somber grey color of Batman’s look. I used Gun Metal over my lid using another E.L.F. brush. Not the best brush, but it cleans well and for a dollar I got what I paid for. Next I used my E.L.F. eye shadow contour brush to blend in black matte shadow from NYX’s eye shadow palette Smokey into my crease. I use the blending brush on my ECOTools Eye Enhancing Duo Set. This brush has one fluffy end for blending out shadows and the other for smudging out colors. I use the fluffy end to blend out the black and silver shadows together.
Typically, I have to go back and add more shadow here or there a couple times before getting the look I want. This time is no different; I had to go back and add more silver shadow since the black was overpowering it a bit.
Finally, I use my Revlon Colorstay Liquid Liner in Skinny Black to get a nice line over my lid. If you’re like me and are a bit scared of liquid liners, then what I usually do is take my regular black eyeliner and draw a line using that first. I recently bought Smashbox’s Always Sharp Kohl Eye Liner in Raven and love it. It’s very pigmented, doesn’t pull to much on my eyes (which I have always had that problem), and the formula is smooth. My only problem is since it has a sharpening in the cap I worry about wasting product, but if it gets covered in shadow, the liner won’t work as well. Pros and cons folks. It’s also pricey, at about $20 plus tax or shipping, but for me, it’s worth it. I’ve used Maybelline’s Gel Liner for a while now, and it dried out way too quickly for my liking. Most pencils aren’t dark enough for me, so Smashbox’s liner is really doing it for me. But cheaper options are out there; despite drying out quickly Maybelline’s Gel Liner is good and a very strong black shade. For a brush I use either E.L.F.’s Angled Eyeliner brush or their Small Angled Brush, both from their Studio brush line.
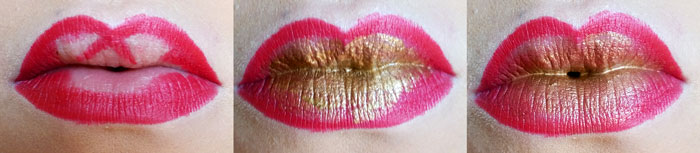
For my lips, which is one of my favorite things to do, I decided screw the rules; I’m going yellow! Okay not full on yellow, because I don’t have yellow lipstick, but I do have gold lipstick from my House of Beauty Lip Hybrid samples. I thought the gold in my Star Wars inspired look would work as a decent substitute for yellow in Batman’s suit. Wanting to experiment some more, I decided to go with an ombre lip,which can turn out awesome or terrible. I’ve had a lot of terrible to moderate what’s-the-point experiences trying to do an ombre lip. This time I think it worked out pretty well.
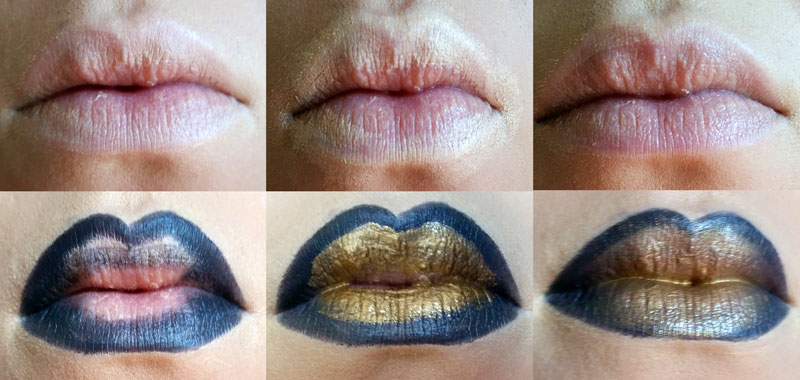
I used my new NYX’s ombre duo lipstick, Hearts and Spades, with House of Beauty’s Lip Hybrid in Treasured. NYX’s ombre duo lipsticks have one side that acts as a liner and another that acts as a lipstick. For Heart and Spades, there’s a deep red lipstick and a black liner. I actually bought it—and it wasn’t cheap at $11.99 plus tax—for Deadpool makeup, but never got around to using it. I used the black liner to outline my lips.
The thing I’ve learned about ombre lips is that you have to blend. You can do this by gently pressing your lips together in a sort of popping motion or you can use your finger. I like to draw some lines on my lips and fill in with the liner almost to the center of my lips. Then I add in the lipstick. For House of Beauty’s Lip Hybrids, you have to have a lip brush. I snagged E.L.F.’s Retractable Lip Brush from their Studio line. I add Treasured to the center of my lips and then gently “pop” them together. A lot of the blending will be done by doing this. But I usually go back and fix any thick lines with a lip brush or my finger.
The thing about House of Beauty’s Lip Hybrids is they’re super pigments, and they have a really weird formula. They are very sticky, almost like if a melted stick of lipstick had a baby with lip gloss. The colors are great, they stand out, and the company has an extremely wide array of colors. However, they transfer like crazy so you have to be careful, and they tend to bunch up if you put too much of the product on. They’re what I would dub as “costume only” makeup, especially considering the price tag of $14 a pop. I got them as small sample sizes for two dollars a piece, but I can’t say in good faith they’re worth buying for $14, no matter how amazing the colors look.
So that’s Batman, on to Superman!
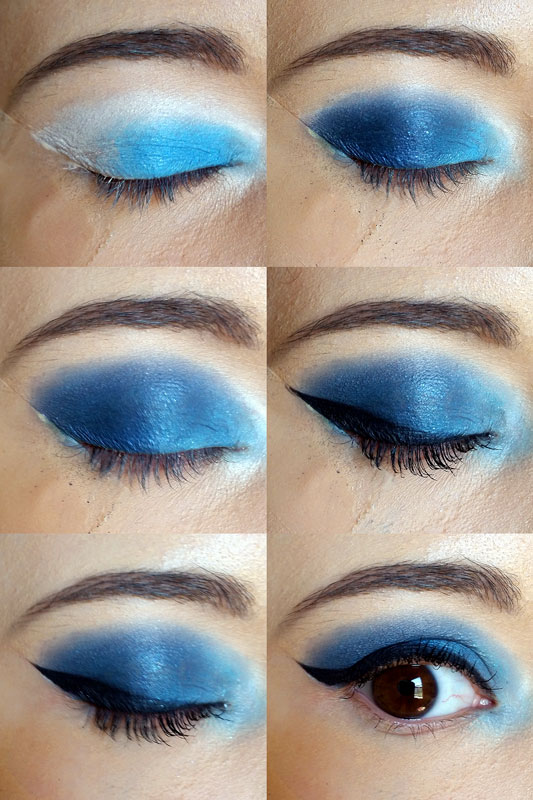
Like I said earlier, Superman’s colors in Batman vs Superman are so muted that I didn’t have anything really close to build off his look. So, I took three blue eye shadows I did have and tried to build more of an inspired look off of them. I used Geek Chic Cosmetics The Lure as my lid shade and Ravenstag—from their Hannibal collection—as my crease shade. They’re both really strong blues that I felt were close to Superman’s overall look. I also used the dark blue shade in NYX’s Eyeshadow Palette Smokey to deepen the crease and add some more dimension. To do that I had to use a smaller blending brush (also, you guessed it, from E.L.F.) and rubbed back and forth into my crease. I always use a blending brush to blend out the colors so there’s no harsh lines. Then I go over the lid with my Smashbox liner and then my liquid for a dramatic effect.
Now lips! For Superman I decided to try an ombre lip for his character as well. Since I haven’t used red—I don’t own red eye shadow and it haunts me daily—I decided to go with a red lip. You can do this look, I think, with a solid red lip, or go ombre, but I went ombre.
First, I outlined my lips completely in red using NYX’s Retractable Lip Liner in Red, then I filled in the middle of my lips with Treasured. Because of the consistency of Lip Hybrids this took more blending. Adding more, I found, only made the product stick together, which didn’t feel nice on my lips at all. But it looked cool! I think you could use blue eyeshadow—preferably powder—to capture that blue centered look on a red lip. Or stick to yellow for the originally yellow “S” on his chest.
That’s it for Batman vs Superman! Which look did you like best? I’m thinking I might rock Batman’s look at the premiere, even if I love them both. Then again, Wonder Woman is right there…


