

It’s October, and when I think October I think bats and baseball. I know that for most people, baseball is a summer thing, but for me, baseball is most made “real” in October, because it’s the playoffs. And October is also the month for Halloween, and when I think Halloween, I also think of bats, although usually the flappy kind, not the wooden kind.
So, it’s in this spirit that I knew that for October this year, I wanted to do a wool winter version of Kate Kane’s Batwoman baseball cap she wears in DC Comics Bombshells.
I was late to the DC Bombshells party, but I am now devoted. Kate Kane is my new favorite superhero named Kate (sorry, Kate Bishop), and this cap is proof of my love, if only for the frustration it’s caused me.
Kate’s cap is somewhere between an earflap hat with an added brim and button on top for securing the i-cord ties and a slouchy brimmed knit hat with earflaps. Because I wanted to work the Batwoman logo in intarsia and not stranded or using the duplicate stitch, it is also worked flat, in two pieces, and then seamed together, before moving to the second stage of the process (adding the aforementioned earflaps, i-cord ties, and button)
It’s also designed for people with big heads (like me) or with a lot of hair that gets smushed when crammed into smaller sized hats and therefore has a slightly loose fit.
I would rate this project as not as difficult or frustrating as the Non-Compliant mitts, as the knitting itself is pretty simple, but it does involve things like seaming, blocking, short rows, and other more advanced techniques.
I’ve settled on this rating scale, for now:
- Accessible
- Basic
- Challenging
- Difficult
- Evil
And I would rate this as somewhere around Challenging and Difficult depending on how comfortable you are with seaming and other techniques—although to be honest, I was incredibly scared to try seaming, and now I’m not at all intimidated.
Yarn Selection, Needles, and Notions
This hat is intended to be a winter hat, so even though it’s way too warm for me to ever wear in SoCal, I chose to knit it using 100% wool yarn. The wool is also to promote stiffness in the earflaps to mimic the Batwoman winged baseball cap. I picked Patons Classic Worsted Wool, because it’s pretty widely available, reasonably priced, and I liked the red, which was bright, but had depth. I picked up two skeins of black and used one entire skein and part of the second.

My gauge was knit with 4.0mm needles and comes out not quite square—4 stitches by 5 rows. I used a 16” circular to knit the large pieces and the brim, 8” straight needles for working the crown peaks and earflaps, and a couple double pointed needles for the i-cord ties.
In addition to the yarn and needles, you will need notions for this pattern! Yes, notions! You will need:
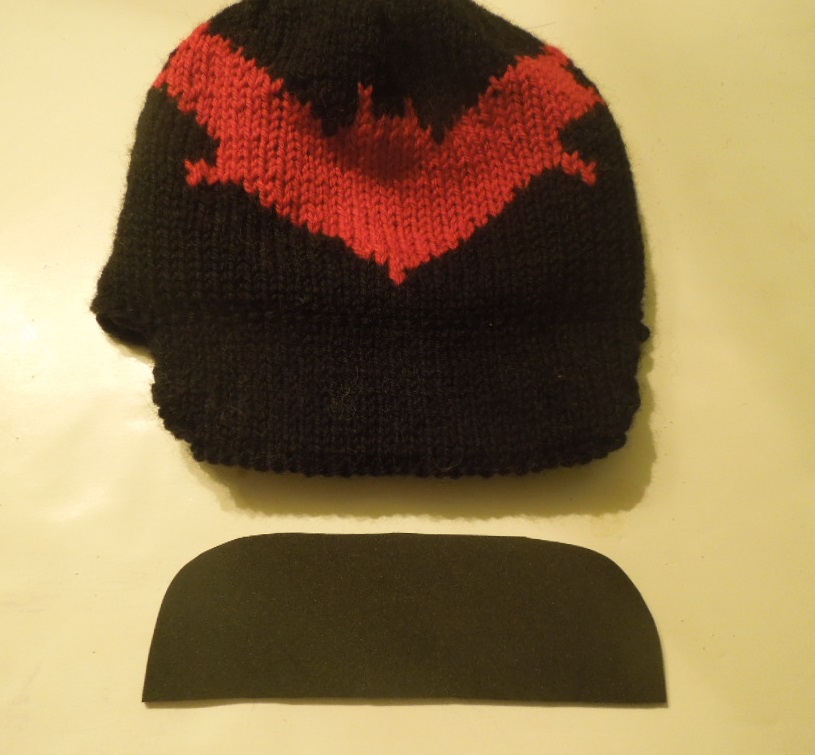
- 1 8 ½ x 11 sheet of craft foam, preferably black, though any color will work
- 1 button — I used this kind because of the dome and the fact that it came with its own cardboard template, but any kind will do according to the tutorial.
- Yarn needle (for sewing the button and seaming)
Chart Construction
As with the previous KYC, I was once again faced with trying to turn a curvy logo into a square-ish frame. I was hemming and hawing over which Batwoman logo to use when DC came to my rescue with this cosplay/Halloween costume tutorial that included large images of the DC Comics Bombshells version of Batwoman’s logo purposefully designed to be put on a hat.
Seriously, thank you DC.
First, I used Stitchboard to create a rough pixelated version. Then I used a spreadsheet to trial-and-error my way to a version of the logo that I liked. Note: This took 10 revisions. Some of my revisions were done by overlaying my pixelated logo beneath the Batwoman logo and holding it up to the light, but finally, I was satisfied.
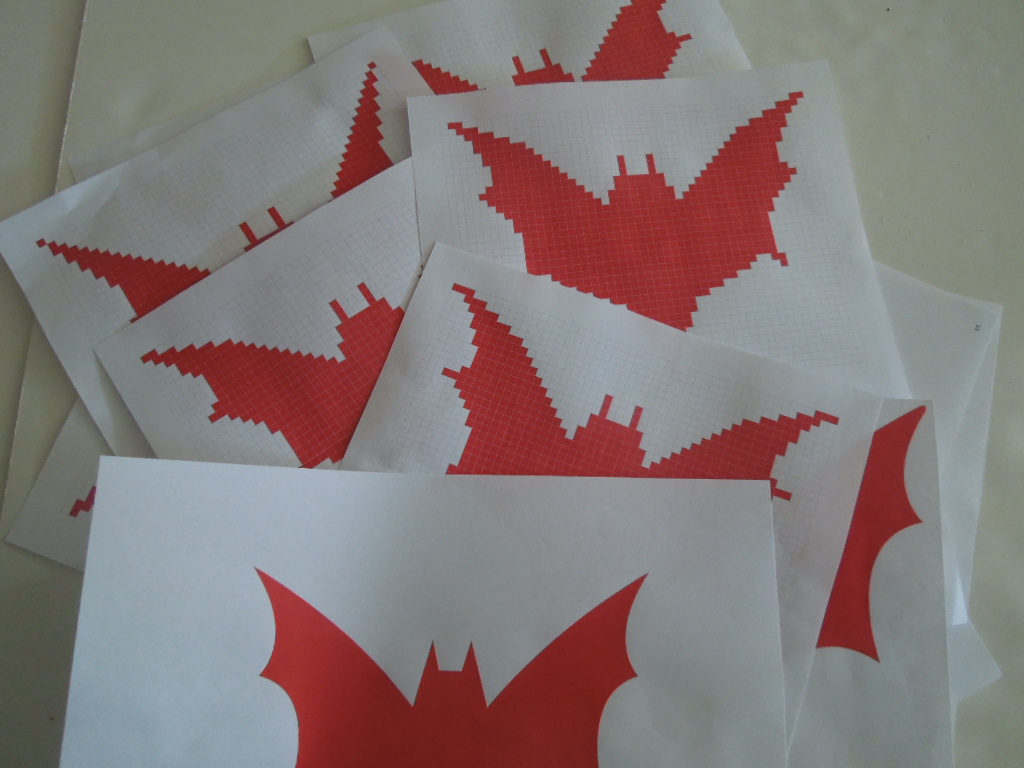
The chart is worked over 39 stitches, from wingtip to wingtip, and is 28 rows high, which comes out to be about 8” wide, wingtip to wingtip, and 4” high, wingtip to body bottom, which makes it slightly larger than the printed version and definitely more slouchy than a “real” baseball cap. If I wanted to be more accurate in terms of size, I would probably knit this in DK or Sport weight instead of worsted.
Pattern
Hat Body Front Half (Charted half)
Cast on 43 stitches, and leave a long tail for seaming up later.
As per advice given on this blog about seaming, I worked the first and last stitches on each row in garter stitch, and the rest in stockinette.
Knit four rows in stockinette (except for first and last stitches, which are worked in garter stitch), before starting chart.
Work chart (28 rows)
Row 33: Knit across.
Row 34: Knit 1, Purl 20 stitches, bind off one, purl to last stitch, knit 1.
Each crown peak is going to be worked separately using the centered double decrease, and you are continuing the garter stitch edging on the first and last stitches.
Row 1: Knit 9, Slip 2, K, Pass 2 (centered double decrease), knit 9.
Row 2 (and all even numbered rows): Knit first stitch, purl across to last stitch, knit last stich.
Row 3: Knit 8, S2KP2, knit 8.
Row 5: Knit 7, S2KP2, knit 7.
Row 7: Knit 6, S2KP2, knit 6.
Row 9: Knit 5, S2KP2, knit 5.
Row 11: Knit 4, S2KP2, knit 4.
Row 13: Knit 3, S2KP2, knit 3.
Row 15: Knit 2, S2KP2, knit 2.
Row 17: Knit 1, S2KP2, knit 1
Row 19: S2KP2.
Bind off, leaving a long tail for seaming.
Hat Body Back Section
Cast on 43 stitches.
Work in stockinette (except for first and last stitch, which are worked in garter stitch) for 33 rows.
Row 34: Knit 1, Purl 20 stitches, bind off one, purl to last stitch, knit 1.
Work each crown peak section the same as the front half.
Blocking and Seaming
Since seaming is so key for this hat’s shape, I took the extra time to block the pieces of the hat before seaming them together, and it was totally worth it. Blocking left my pieces smooth and ready to seam.


I was scared to seam. I was really, really scared. I haven’t been this scared since the first time I turned a heel on a sock. But I had consulted this blog, and I had blocked, and so, just as when I first turned a heel, I just had faith, followed the directions, and was victorious.
It was actually really easy. Embarrassingly easy. Why was I ever scared? The only thing I will add is that there’s a slight puckering at the center seam where the peaks are joined together with one another, but it’s less prominent than another row of centered decreases would be, so I’m okay with it. Also, the yarn at the very center of the hat should be tied off on the inside, and the center dimple will be covered with a decorative button.
Brim
Pick up 33 stitches on your 16” flexi circular needle.
First row (WS): Purl across.
Continue in stockinette for 5 rows, ending with a (WS) purl row.
Row 7 (RS): Knit to last stitch, W&T (wrap and turn: slip 1, bring yarn between needles, return slipped stitch back to left needle. Turn work. Return yarn to working position, now between stitches).
Row 8 (WS): Purl to last stitch, W&T.
Row 9 (RS): Knit to last two stitches, W&T.
Row 10 (WS): Purl to last two stitches, W&T.
Row 11 (RS): Knit to last three stitches, W&T.
Row 12 (WS): Purl to last three stitches, W&T.
Row 13 (RS): Knit across to last three stitches. Turn as normal.
Row 14 (WS): Knit across to last three stitches. Turn as normal. Note that this is the lone row of garter stitch in a sea of stockinette and acts as the brim edge when the brim is folded under.
Row 15 (RS): Knit across to last three stitches, knit wrapped yarn and stitch together, W&T. Two slipped stitches remaining.
Row 16 (WS): Purl across to last three stitches, purl wrapped yarn and stitch together, W&T. Two slipped stitches remaining.
Row 17 (RS): Knit across to last two stitches, knit wrapped yarn and stitch together, W&T. One slipped stitch remaining.
Row 18 (WS): Purl across to last two stitches, purl wrapped yarn and stitch together, W&T. One slipped stitch remaining.
Row 19 (RS): Knit across to last stitch, knit wrapped yarn and stitch together. Turn as normal.
Row 20 (WS): Purl across to last stitch, purl wrapped yarn and stitch together. Turn as normal.
Row 21 (RS): Knit across to last stitch. With last stitch still on needle, pick up an edge loop from the row below stitch. (Hint: The same little bar you pick up when seaming works great to pick up for edging.) Knit last stitch and edge stitch together. Turn as normal.
Row 22 (WS): Purl across to last stitch. With last stitch still on needle, pick up an edge loop from the row below stitch. Purl last stitch and edge stitch together. Turn as normal.
Row 23 (RS): Knit across to last stitch. With last stitch still on needle, pick up an edge loop from the row below stitch. Knit last stitch and edge stitch together. Turn as normal.
Row 24 (WS): Purl across to last stitch. With last stitch still on needle, pick up an edge loop from the row below stitch. Purl last stitch and edge stitch together. Turn as normal.
Row 25 (RS): Knit across to last stitch. With last stitch still on needle, pick up an edge loop from the row below stitch. Knit last stitch and edge stitch together. Turn as normal.
Row 26 (WS): Purl across to last stitch. With last stitch still on needle, pick up an edge loop from the row below stitch. Purl last stitch and edge stitch together. Turn as normal.
Row 27: Bind off loosely, leaving a long tail to stitch the pocket closed.
For extra support, cut and shape a piece of thin craft foam for the brim. Place the foam brim inside the brim pocket and sew shut using whipcord stitch or your preferred method.
Earflaps and I-cord Ties
The earflaps are symmetrical and made the exact same way! Woohoo! They are also made in two parts, then seamed together for extra stiffness. For even more stiffness, the same craft foam used for the hat’s brim can be added before stitching the pocket closed.
Earflap Part 1
Pick up 25 stitches on either side, overlapping one stitch with the brim using 4.0 mm straight needles, and leaving a longish cast on for seaming.
As with the crown peaks, you’re creating a triangle with a garter-stitched edge.
Row 1 (WS): K1, purl across to last stitch, K1.
Row 2 (RS): Knit across.
Row 3 (WS): K1, purl across to last stitch, K1.
Row 4 (RS): Knit across.
Row 5 (WS): K1, purl across to last stitch, K1.
Row 6 (RS): Slip first stitch, Knit 1, bind off first stitch, knit across.
Row 7 (WS): Slip first stitch, Purl 1, bind off first stitch, purl across.
Repeat rows 6 and 7 until there are three stitches remaining.
Switch to double pointed needles and continue in i-cord for 12 inches. Bind off.
Repeat for other earflap.
Earflap Part 2
Cast on 25 stitches, leaving a long tail for seaming.
Row 1 (WS): K1, purl across to last stitch, K1.
Row 2 (RS): Knit across.
Row 3 (WS): K1, purl across to last stitch, K1.
Row 4 (RS): Knit across.
Row 5 (WS): K1, purl across to last stitch, K1.
Row 6 (RS): Slip first stitch, Knit 1, bind off first stitch, knit across.
Row 7 (WS): Slip first stitch, Purl 1, bind off first stitch, purl across.
Repeat rows 6 and 7 until there are three stitches remaining.
Final row: Centered double decrease, bind off.
Block the earflaps and seam together earflap halves, creating a pouch for the foam. If desired, cut and shape craft foam and place inside before sewing the bottom edges together.
Decorative Covered Button
I used this tutorial for my decorative button, and although there is a lot of set up considering how fast the yarn winding actually takes, I feel it was worth it, and that the button looks cuter like this than if I’d just covered them with black felt.
Once the button is covered sew to the top of the crown.
Finishing and Final Thoughts
Make sure all the ends from your intarsia bat, the brim, earflaps, and seaming are woven in…and that’s it!


If I was going to make this hat again, I would definitely use DK weight yarn instead of worsted. The proportion of ear to hat is not quite large enough to make me happy, but the construction techniques worked, and I learned a lot about seaming, blocking, and other things that scared me, so thank you, Kate Kane, and thank you DC Comics Bombshells! Now go read the comic!

