
Welcome to the first ever Knit Your Comics!
Since it is the first, I am not at all yet sure what it is going to be, but I can tell you what KYC aspires to be.
Knit Your Comics aspires to be a place to share projects inspired by comics (and maybe later, other media). It’s also an excuse for me to make things for a purpose and justify my knitting habit.
I have a bad habit of wanting to reverse-engineer everything I see that’s knitted, which is probably why the first thing I ever learned to knit were Harry Potter scarves. When you understand that about me, it will probably be slightly more understandable that when I recently read and fell in love with Noelle Stevenson’s Nimona, my first reaction to reading this comic was to ask myself, “How would you knit that?”

The scarf that Nimona gives Ballister appears to just be a normal knitted red scarf with fringe. It’s something that I, if I were going to try to recreate faithfully based on visual appearance, would probably just do as a tube scarf in something soft and washable, like a bamboo/silk/wool blend, in worsted or sockweight, add some fringe to close up the top and the bottom, and call it a day.
But this project isn’t that. That would be too easy…
See, I got stuck on the part where Nimona describes how difficult it was to knit with hooves, but that she got the hang of it. An idle thought came to me: well, that’d be one use for arm knitting.
Arm knitting, for those who don’t know, is actually fairly controversial in knitting communities and for good reason. It’s new and trendy (and therefore suspect), the yarn itself is expensive since it has to be so incredibly bulky for it to look good, and it’s mostly limited to giant projects like cowls, scarves, and blankets.
But it is something that someone could do if they had hooves, especially if they were magic and creative like Nimona, and hence, this project was born, as my way of paying tribute to Nimona.
Part 1: Yarn Selection
I’m using yarn generously as what I purchased was not actually yarn. Once again, I was struck by Nimona’s wording in the comic. She states that she turned herself into a sheep to get her yarn. There’s no mention of spinning said yarn, which led me to look at wool roving.
Wool roving is a semi-processed wool that is mostly bought by people who want to spin their own yarn, which is pretty awesome, and I hope to try one day. But what is also awesome about wool roving is that you can buy it pre-dyed, which is how I settled on this particular brand, because Nimona is a very distinct shade of light red-verging-on-pink, and this was as close as I could come to it without actually buying raw roving and dyeing myself.
I bought three bags, not having any idea what “½ pound (8 oz) bags” would mean in terms of arm knitting gauge, but hoping that three would be enough. It actually ended up being the perfect amount, so if you are looking to duplicate this project, three bags will work and keep your project around $50.


Part 2: Pattern Construction
I knew nothing about arm knitting going into this project, but I know what I like. I looked up arm knitting projects on Ravelry and settled on the technique taught in this video because it basically teaches how to do stockinette when arm knitting, which I liked the look of better than the garter-stitch versions. I also really needed a video since I’d never done arm knitting before.
But, naturally, I wasn’t happy just to follow along with the pattern given.
You, see … Nimona’s scarf has fringe, and I got it into my head that the best way to add fringe to this would be by just sewing the live stitches down rather than casting off and casting on as shown in the video. I came to this decision partially because of aesthetic and partially because I wasn’t sure how the roving would react to being cut or if I would even have enough roving left over to create fringe using the traditional methods.
Essentially, I wanted to follow the same construction that you would if you were making a cowl that you were going to join together with kitchener stitch, which meant I needed to modify the pattern to include COWYAK, and also find a yarn that I could COWYAK with.
COWYAK is the acronym coined(ish) by TECHKnitter and explained in this post. It’s a way of creating a provisional cast on that will create live stitches at either end of a garment. It’s perfect for this project, and it also meant I got to practice my arm knitting before using the roving.
I happened to have a skein of this yarn leftover from a Christmas present I made for my sister a couple years ago. It doesn’t look like much in the skein, but it is actually one of those super bulky tube yarns that stretches out. I stretched the whole skein out using my forearm and spent more time stretching and untwisting the yarn than actually knitting with it.


The other modification I made to the pattern was that I only cast on three loops rather than four as shown in the video. I did this partially for concerns I would run out of yarn and partially because I wanted a longer, skinnier scarf than the bulkier cowl shown in the video.
Part 3: THE KNITTING
So, arm knitting takes a while to get used to if you’ve never done it before. I actually ended up arm knitting the COWYAK portion three times before moving on to the wool roving.

But another cool thing about arm knitting is that it’s fast. Even stopping to take pictures of all the steps and knitting the COWYAK portion multiple times, I was done with this scarf in an afternoon. It’s also easy. Granted, I knew what loops to do and what the finished product was supposed to look like, but it was still really easy to pick up.
Once I finished knitting, I had to undo my COWYAK and secure the loops until I could secure them with weaving and a needle and thread for extra security. I used hair clips to clip the loops while I unraveled.


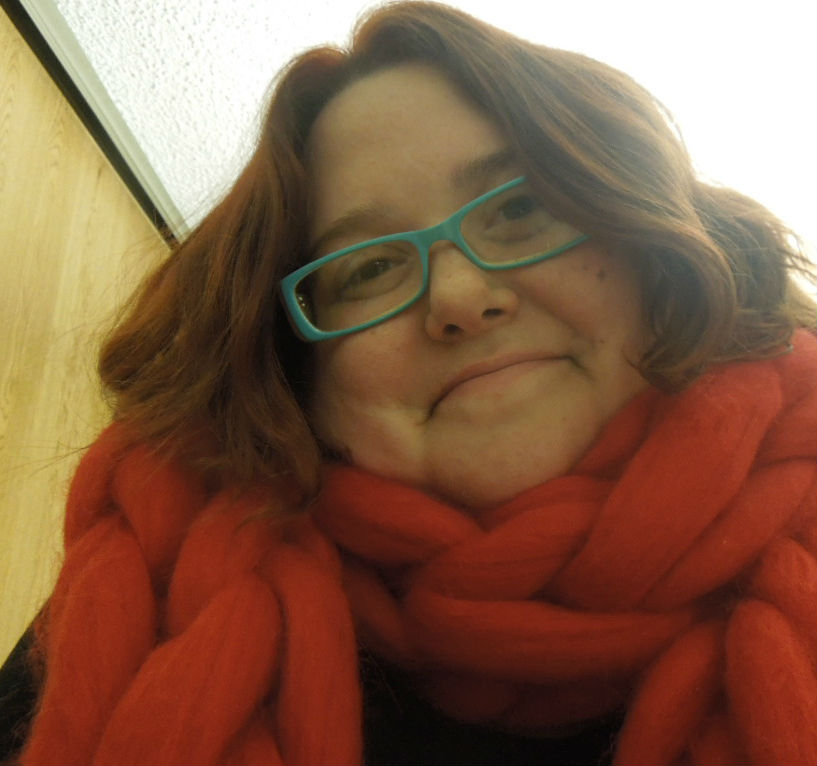
Part 4: The Finished Product

As an artist, when I look at a finished project all I can see are the flaws, and what I would do better if I did the project over again. I see loops that are uneven and I’m not happy with the way my COWYAK edge turned out.

That being said, I think the scarf looks amazing. It’s exactly what I pictured it could be. It’s thick and fluffy and the perfect length, and I find the little end loop fringe to be really endearing. The wool roving is super soft and not at all scratchy, and it would keep you so incredibly warm in cold weather.
Unfortunately, I live in Southern California where it’s currently 100 degrees, so I won’t be able to wear this anytime soon, if ever.
…but it looks pretty?