

Previously, in Cook Your Comics Thanksgiving Spectacular:
Part 1: Green Bean Casserole, Glazed Carrots, Holiday Sweet Potato Casserole
Part 2: Corn Casserole, Cornbread Dressing, Annie’s Fresh Cranberry Sauce
Part 3: Pecan Pie, Chocolate-Bourbon Pecan Pie
And now for the grand finale and main event of the evening: turkey!
Roasting a turkey feels a bit intimidating if you haven’t done it before. I started helping my great-grandmother prepare the Thanksgiving turkey when I was about eight years old, and as each year passed, I became a little more helpful. By the time I was a teenager, I could do it mostly by myself, although it’s always helpful to have an extra pair of hands to help you wrangle that heavy, slippery bird. If you’re making a turkey in the JSA kitchen, I bet you can find some strong person to volunteer. Which hero would you ask? I’d ask Power Girl first, and would suggest she put on an apron first. Wouldn’t want to get turkey juice on her clean, white costume.
On the day I shot the pictures for this article, I got into the family gathering, team-up spirit and went to my sister’s place. The hands in these photos are Nicole’s, and the turkey recipe is one she perfected last year when she cooked a turkey for the first time and made it better than everyone else’s. She’s also better than I am at making gravy!
Note: You have to get really in touch with that fact that you’re dealing with a great big dead bird. Sorry vegetarians and squeamish folks! I promise I left out the pictures of the ickiest parts. Maybe skip down to the part further down where I’ll talk about the best mashed potatoes I’ve ever eaten.
Roasted Turkey with Citrus and Sage
1 raw turkey, 12-14 pounds (fresh or frozen)
5-6 lemons
2-3 large oranges
2 large onions
1 head of fresh garlic
1-2 bunches fresh sage
1/2 pound salted butter, softened
kosher salt
fresh ground pepper
olive oil
turkey-size oven bag
disposable aluminum roasting pan (optional)
large roasting pan
These are recommended, approximate amounts for a turkey that’s between 12 and 14 pounds. You can scale up as needed. It’s common to find turkeys that weigh 20-24 pounds and guess what? They’re way bigger and more challenging. It’s harder to get a lot of flavor to permeate the meat in a very large turkey, but this method should still work well and keep it moist.
This recipe works best if you use a turkey-size oven bag. You can find these in the grocery store with the zip-top bags. Using the bag helps keep the turkey moist and you won’t have to mess with it once it’s in the oven. You have two options:
1. You can put the turkey in the bag with the extra stuffing elements (lemons, oranges, onions — see below) underneath, then place it in the pan, seal the bag, and put the pan in the oven. OR…
2. You can put the turkey and extra stuffing into the disposable roasting pan (which can be rinsed out and recycled when you’re done) and put the turkey and pan inside the bag. Seal the bag and set it pan inside a larger, non-disposable roasting pan. Put it in the oven.

One huge benefit of using the bag method is that clean-up is minimal after the turkey is done. There’s no huge greasy pan with burned-on gunk to contend with. Save yourself some trouble and make yourself a poultry nesting doll.
If you get a frozen turkey, it needs time to thaw. The bigger it is, the longer it takes. If you’re planning to put it in the oven Thursday, get your frozen turkey into the fridge to thaw by Monday. You need to keep it in a roasting pan or something that can catch juices as the turkey thaws. If it’s still a bit frozen when it’s time to start prepping it, you can put it in your kitchen sink and run cold water over it until it thaws.
Before you start dealing directly with the turkey, make a compound butter. A compound butter is butter that has seasonings mixed into it. For our purposes, take 2-3 cloves from the head of garlic, peel them, and mince them finely. Then take 8-10 sage leaves, pull off the stems, and mince them. Put the softened butter in a bowl and zest two lemons (hold on to those lemons – we’re going to use the rest of them in a few minutes) over the butter. Add the minced garlic and sage and mix it all together. The mixture will smell really good. You can make compound butter a few days beforehand and keep it in the refrigerator until it’s time to prep the turkey.

First, if you want to, pop on some disposable gloves. When the turkey is thawed (or whenever, if you have a fresh turkey), get it out of the plastic wrapper. Watch out — juice will go everywhere. There is probably a plastic contraption tying the ends of the legs together. This made it possible to package it, but you need to get rid of it now. Cut the plastic, free the legs from it, then pull it out of the inside of the turkey where it’s anchored.
You will notice that the turkey has two open ends. The smaller, shallower opening should have a little bag stuffed in it with the turkey’s giblets (heart, liver, etc.) inside. Some people use those in giblet gravy, but I never do because I can’t cope with organ meat. You can throw that away if you want. Just make sure to take it out. The turkey’s neck is also inside, stuffed into the main cavity. Some people use the neck, but I toss it. Want recipes to use the guts and neck and stuff? I’m almost positive someone has put this information on the internet, so happy hunting.
Once you have all the spare parts cleared out, dry the turkey off with paper towels so seasoning will stick better to the outside, and put it in your roasting pan breast side up. Now it’s time to stuff the inside. I never use a traditional bread-based stuffing on the inside. We have cornbread dressing as a side dish instead.
Preheat your oven to 325F.
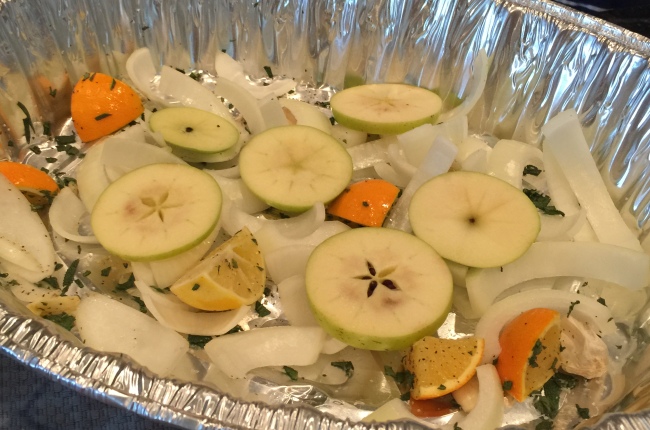
Cut up the lemons and oranges into wedges. Peel the paper from the outside of the onions and cut each onion into approximately six pieces. Put the chopped oranges, lemons and onions in a bowl. Mince several more sage leaves, add them to the bowl, and toss them all together. Grind some fresh pepper into the bowl and sprinkle some kosher salt over it.
Now it’s time to stuff that turkey! Grab handfuls of the citrus/onion/sage mixture and start putting them into the turkey’s main cavity. You can put a handful or two in the smaller cavity on the other end as well.

When the cavity is filled, you should have some onions and citrus left over. Lay those down in the bottom of your roasting pan. Separate the layers of your onion chunks and scatter them in the pan. We’re making a bed for the turkey.
Cut the rest of the head of garlic in half crosswise, so each clove is cut open. Add that to the roasting pan.
It’s time to give the turkey a massage…with the compound butter. Take a handful of butter and start rubbing it all over the outside of the turkey. Get it in the bottom, all over the drumsticks, under the wings. The butter is going to keep the turkey moist and give it flavor.

You know what else is going to give it flavor? The butter we’re going to put between the skin and the meat! All that massaging helped loosen things up, so it’s time to get your fingers under the skin and eventually work your hand underneath with a fistful of butter. If necessary, use a knife to loosen the skin at the edge of the cavity. The skin should pull away from the meat with only a little resistance. Rub the butter all over the breast meat, everywhere you can possibly apply it. You can go in through both ends. Have you ever seen a movie or TV show where someone is fretting over a turkey and constantly running in to baste it? Do this and you don’t need to do that.

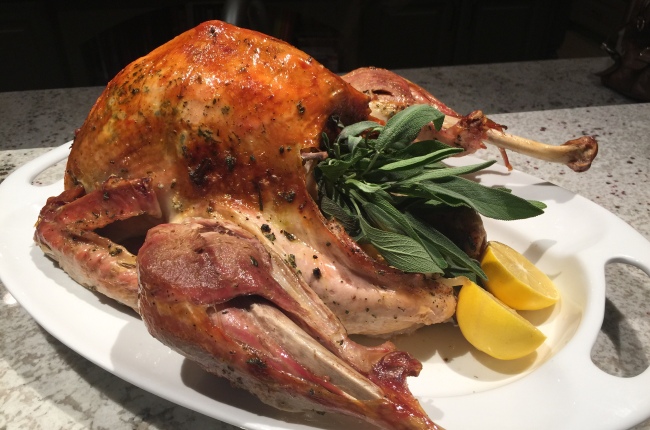
Prep is done now. Follow one of the bag/pan methods described above, then get the turkey into the oven. For a 12-14 pound turkey, it needs to bake for about two hours and 15 minutes. When it’s done, get it out and let it rest a few minutes before opening the bag. Watch out for the hot juices!
Once you have access to the turkey juices, make the gravy. Here’s a great recipe. You can use the turkey drippings, or just use turkey or chicken stock. Easy and delicious.
Put your awesome turkey on a platter — or carve it in the kitchen — and it’s dinnertime!
Hey, bonus recipe! While the turkey is in the oven, you can make mashed potatoes. Here’s a recipe for the best mashed potatoes I’ve ever made or eaten. Once again, because it’s me, it’s in casserole form.
Loaded Mashed Potato Casserole
2 pounds white potatoes (you can peel them or not — your call)
1/2 cup butter
12 ounces sour cream
1/2 cup shredded Parmesan cheese
1/2 cup shredded Gruyere cheese
1/2 cup shredded aged white cheddar cheese
3 Tablespoons chopped chives
1-1/2 cups fried onions
Wash the potatoes, cut them into chunks of roughly equal size, and boil them in water just until they can be pierced easily with a fork. Drain the potatoes into a colander and put them back into the pot.
Add the butter and sour cream and start mashing. The butter will melt quickly since the potatoes are hot. Throw in the chives, then gradually add the cheese while you keep mashing until the potatoes are the consistency you like. At this point, the potatoes are mostly serving as a binder for various dairy products.
Put the potatoes in a greased casserole dish and distribute them evenly. Then sprinkle the fried onions on top. You can put them all over, or get cute like we did and make a design. We crushed the fried onions to make them easier to shape our design.
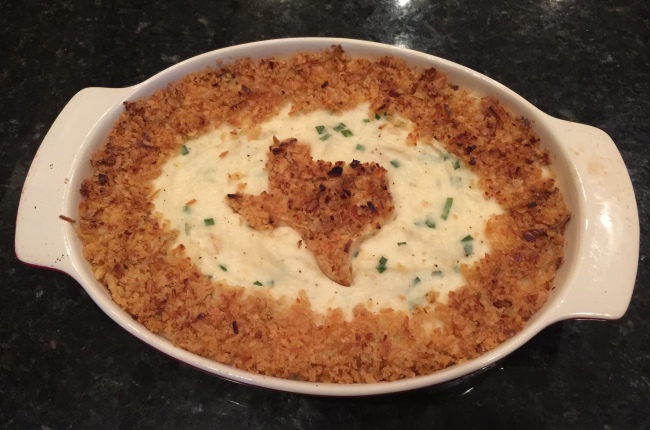
Bake at 350F for 15 minutes, so the fried onions get brown, then pull it out to cover with foil so the onions don’t burn. Put it back in for another 20 minutes or so, until it’s piping hot all the way through. Remove from the oven and try to keep yourself from eating the whole thing, possibly with your hands, before it makes it to the dinner table.
And that’s it. You’re done. Enjoy dinner with your family and/or superhero teammates, then take a nap. Make somebody else do the dishes.

